Wednesday, August 18, 2010

More Corsetry

I've spent the last few days working on my corset (and weaving chain maile - I finally figured out how to link the chains - YAY!!!) I started out with just the plain ol' corset, but I needed to have all kinds of leather straps running across it. For the leather straps, I originally started out with the leather that I made the corset out of, but there wasn't enough definition that way. So, I purchased a reddish vinyl. Yes, I know, VINYL. But, it was way cheaper than the leather version and it was actually a better color, too. I cut out a pattern with my giant grid paper, but cut it slightly bigger than the piece so that I could fold the vinyl under to get rid of the rough edges.


I am ashamed to say that I used a hot glue gun to fold the edges under, but I had no choice. The other glue takes FOREVER to dry, and sewing just looked awkward.


I then placed the pieces where I thought they belonged on the corset and glued them using SoBo Premium Craft and Fabric Glue. These had to glue overnight before I could do anything with them.

I had several silver pendants that I purchased from JoAnn Fabrics. Matt drilled out the centers, and I stitched them on using very thin leather thread. The silver square I had to hot glue on. (In the following picture, I hadn't yet glued or stitched anything on yet.)


I then started work on the back of the corset. The tan strips of vinyl have to go over the shoulders and then attach in the back and some of the straps have to attach from the back to the front, so I had to put the corset on the dressmaker's dummy in order to get everything to fit correctly. Some of the straps will attach using velcro. If I permanently attach the strips, I can't get the corset on. And if I use snaps or something, that won't work if I need to adjust the corset. Some of the straps are attached to each other using a belt buckle (one side is permanently attached, the other side will attach to itself with velcro.) I am ashamed to say that I again used the hot glue gun, only because it's so much faster and the other glue takes so long that the pieces would have slipped out of place. When I have everything attached correctly, I will lay it out on the table and reinforce every piece with the SoBo glue.

The last thing I worked on tonight was I took rivets and flattened the top part that attaches into the leather. I then glued (with hot glue - yes, it should work fine for this part) that onto the leather. This way, the rivets are in there without actually having been riveted. After the grommets, the thought of riveting together all the leather and vinyl just about made my head explode! Anyway, here's the front of the corset partially completed (not all the rivets are on yet - I ran out of hot glue!)


I'm still working on the chain maile for the top of the costume, but that's coming along pretty well. I had to purchase another 3 pounds of rings, so hopefully they'll be here in a few days and I can start making chains again. It's going REALLY fast now that I know what I'm doing. I got the entire front done during two episodes of Doctor Who (which means some of that time was spent watching and not weaving.)

Also, I still need to figure out what to do with that dratted collar. Maybe once the chain maile is in place I can more accurately gauge how big the collar needs to be.

It's not perfect, but it's pretty darn close!!! It also looks less cheap when it's not illuminated by a flash. I'm still working on the back, so I'm not going to upload those pictures quite yet. Here is the original again for comparison:


Monday, August 9, 2010

Bow!

I FINALLY figured out what to do with the bow! The answer: PVC pipe. I found a terrific website on how to bend PVC: http://www.pvcworkshop.com/bendpipe.htm The trick is to not only heat it thoroughly, but also to fill the pipe with sand so that the heat is distributed evenly and the pipe is supported so that it doesn't kink.

I started out with a five foot length of 3/4" diameter PVC pipe, but it was just a little too wide. But, I used it as my practice piece. I nailed nails into a board in the shape that I wanted, took out the heat gun, and got to work. It took about a minute to get the plastic soft enough to shape, and it has to be heated in no more than about a 2-inch width, so this was a bit time-consuming. But, it worked perfectly!


Once I was done, I decided which end I liked best, flipped over the board, and drew an outline of that side of the bow. Then I flipped the bow over and outlined it on the other side so that the outline would be exactly symmetrical. Because the middle of the bow is straight, you can also lengthen or shorten the bow length, determined by where you place the bow for drawing the outline (I shortened the bow a few inches.)

I went back to Home Depot today and got another five foot length of 1/2" diameter piping, and it is the right size. So I set about shaping it again. An observation - when the heat gun is on, it smells like the popcorn air popper. And if you get too close to the plastic, it browns to a nice golden color, like a toasted marshmallow!


But now I have the bow in the right shape. I'm going to cut off the ends and shape it with some kind of putty or clay to get the nice pointed ends of Susan's bow. I'm very excited - the rest should go pretty smoothly. This was definitely the biggest obstacle in making the bow! And it cost $2!

And here's the original for comparison - mine might be a tad too big, but I don't care - it's freaking cool!


Also, I ordered my shoes today! They're the ones third from the left. They're not quite that color, but they're the closest I could get.

Sunday, August 1, 2010

Chain Maile

Today was kind of a bust. I'd made a form for the quiver last week. I used a giant styrofoam cone and whittled it down to the correct shape (which is an elephant tusk.) I then made a form using paper mache.


I was going to sculpt the quiver today using oven-bake clay, which I rolled out into thin layers with a wine bottle. It kind of looked like raw bacon or something. Disturbing, especially since we just had a pig roast yesterday.


Well, the clay was just not working. It was lumpy, it was stretching out, it just was not good.


So, I gave up. Matt suggested using fiberglass or something - I don't know, he'll have to tell me what to do. It's apparently what he used to make the form for his R2D2 dome. My biggest concern is that I have to be able to sculpt this, and I'm not good at sculpting. I need something that won't dry until I want it to!

Anyway, I gave up on the quiver for today and turned to the chain maile. Remember, I spent a long time making chains, and Matt spent a long time piecing those chains into sheets of maile. We ended up with two big sheets of chain maile.


What I did today was I split both sheets of maile into two sheets, so I ended up with four identical sheets of maile. I was trying to figure out how to attach it to the corset without 1) ruining the corset, and 2) making it look fake. Matt suggested hand sewing it to a belt, but I broke the needle on the first attempt and didn't even get it all the way through the belt. Then I remembered that I had an extra leather cord!

I wove the cord through the top row of maile, tying a knot on the last ring of each sheet to keep it in place so it didn't slide. This way it has enough body that it can move and ripple as I walk like a full shirt of maile, but it's not going to slide around. This will tie around my waist. And - ta da - I've got a maile skirt! (Click picture to view larger image!) I will spend this week making chains for the top and the sleeves!

Saturday, July 17, 2010

Corset

Argh! How did I not post the corset pictures? Bad, bad, bad!! I am so proud of it, too!

I spent last Thursday re-watching the first few episodes of Torchwood and working on my corset. To this day, I can tell you what I watched for each part of every costume that I made and every counted cross-stitching project I've made. For instance, my nephew's birth announcement was seaQuest and A Haunting. My other nephew's was made during the commentary from LOTR and Chronicles of Narnia, plus a few Disney movies.

Anyway, I crouched over my table downstairs and got to work on the corset. First I measured the grommets out 1.5 inches from each other, and marked it with chalk. I put all the grommets in, but then once the corset was stitched up, it was still WAY too big. I managed to cut the sides down to where I thought they needed to be, and I also needed to cut the top part of the back panel down. It was just too high. So that meant more sewing.

I figured I only had one more shot to get this right, and several grommets kept falling out of the first run-through, so I tried cutting the hole for the grommets first. I did this by putting in an un-painted grommet, then peeling the back off and taking the grommet out of the hole. Luckily, I had a gross to work with, and I only needed 45 at the most.

After I punched out all the holes, I put in the pewter grommets. A few have still fallen out again just due to the fact that they were a tad too close to the seam and couldn't lock right, but I managed to put new ones in that worked. If anymore fall out, I'll put a dab of glue on the next grommet before I put it in.

I laced up the corset using leather cording that I got at Hobby Lobby, and I think it looks GORGEOUS. It fits like a glove now! Please excuse the angle of the corset - I cannot get it to sit correctly on the mannequin just because it's so very hard to lace it up on that thing. It also laces up much tighter on me than on the dummy.


Arrows

This Thursday I spent the whole day focusing on the arrows.

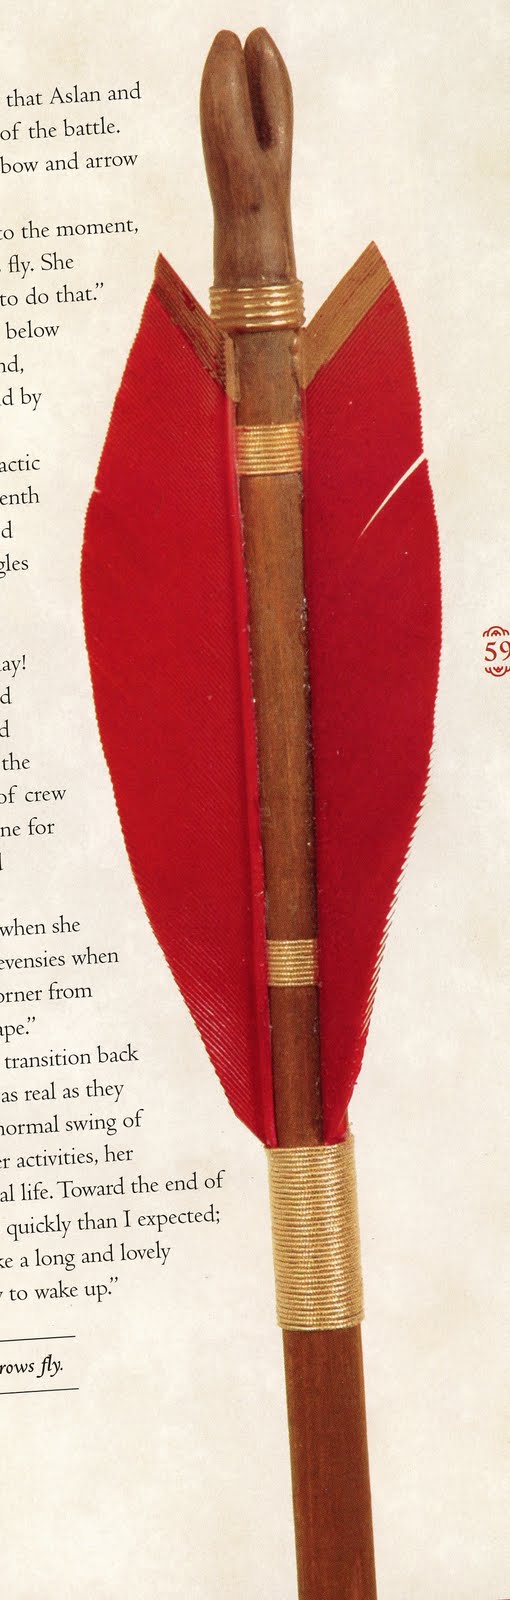
Remember, I'd spray painted five dowel rods a few weeks ago, as well as a bunch of plastic feathers, so it was time to put them all together. I used the dremmel to cut notches in the backs of the arrows (results varied), sanded them down to make the ends a bit rounded, then spray painted them brown again.


After the arrows were dry, I took gold cording and hot-glued one end to the arrow, then wound the rest around, then hot-glued the other end. I had to do this on three spots of each arrow.


I then had to put the finishing touch on the feathers. First, I needed to shape the tops, since the feathers on Susan's arrows aren't rounded. Then, they needed to have a thin band of gold along the tips. I used just gold acrylic paint for that. After that was dry, I hot-glued the feathers onto the arrows, which wasn't as hard as I thought. Although, at one point I had to peel the feather off because it was a little too crooked, so that was annoying.

Finally, I had to put on the last bit of gold cord, the part that wraps around the bottoms of the feathers.


Ta da! I think they look fantastic! The camera doesn't do them justice because of the flash. I still have to do a few touch-ups where I chipped off some of the paint, and I have to cut off a few drops of hot glue with an Exacto knife, but these are mostly finished. I am going to shape one arrow head so that I have one to pose with.

Now I just have to figure out what to do for the bow. I brought home my bow from Michigan, but it's just too long. I am starting to think that I might try to use PVC. I found clay that is supposed to look like wood when it dries (not sure how this will turn out) so I can shape it around the PVC to make it thicker where necessary. The problem with using regular clay is that 99% of it is oven-bake clay, and obviously, not only will the bow not fit in an oven, I don't think we want to be putting PVC in there!

Oh, and here's the picture that I was going off of - this is from one of the Narnia behind-the-scenes books. I think I got about as close as I could get without using real feathers.

Monday, July 5, 2010

Spray Paint Craze!

The other day I had to spray paint three different things for the Susan costume. First, I had to spray paint the grommets that I just got in the mail. They only had gold grommets, and Susan's are more of a dull color. I used Valspar Odds 'n' Ends Fast Dry Enamel in Pewter. You can see the grommets at the top are upside down and are gold. The ones closer to the bottom of the picture are the pewter ones. I really wanted something a bit more coppery, but I could only find BRIGHT COPPER!!!! and didn't want that. So I figured pewter was the next best thing.


Then, I decided to buy some dowel rods to make the arrows. Those got painted with Krylon Indoor/Outdoor Gloss in Equestrian. I didn't realize that the little white thing in the spray nozzle distributed the paint more evenly. I thought it was a stopper and removed it, and ended up with essentially a steady stream of paint. Well, I figured it out after I finished one coat (the rods covered up pretty quickly.) For the second coat, I put the sprayer back on the nozzle, but the damage was done. There were little raised bumps all over the arrows from the dripping paint. I ended up sanding them with some really fine sandpaper. (By the way, be CAREFUL if you're going to sand a dowel rod - I almost set my hand on fire! I'm lucky I don't have burns on my fingers.) I'll try spraying them again tomorrow just to give them a second coat. The next step will be to add some gold bands, a cap on the end of the arrow, and I think I'll fashion one arrow tip out of clay. That will be for photo ops only. The other arrows will be permanently fixed inside the quiver.

Finally, I bought a bunch of 4" arrow fletching replacements at Dick's Sporting Goods. These are going to eventually be glued to the arrows. Half of the 36 feathers that I bought were green, and half were white. I spray painted them red using Krylon Short Cuts Red Pepper. Have you any idea how HARD it is to spray paint these things? First of all, they weigh just about nothing. Second, they are meant to fly through the air, so of course they FLEW all over the place when I started spraying! I decided to do most of the feathers, even though I only need about fifteen, just because I knew some of them would get really messed up. They would flip over and get the wet paint on other feathers that were already wet, and when I'd flip them back over the paint would get the impression of my finger (I wore latex gloves, BTW.) At least, if I don't have enough decent ones, I can always scrap the paint off and try again.

All in all, I am quite pleased with how all my painting turned out. I'm also excited that I was able to work on little piddly parts of the costume while working up the courage to finish the corset. That will be my big challenge tomorrow - hemming and grommeting the corset! I figure it's better to make it a tad too small than a tad too big; after all, I can always loosen the laces if it's too small, but I can only tighten them so much if it's too big!

Thursday, July 1, 2010

Shopping!

Went to the store to get trim for my Clockwork Droid vest. Came home with tons of stuff for my Queen Susan costume! Got the dowels for my arrows, paint for the grommets (I got gold ones and I need silver), and ornaments for the corset. SOOOO excited! I didn't know WHAT I was going to use for those circular corsets, but apparently, jewelry-making is a HUGE thing since the last time I went to Michaels or JoAnn Fabrics, and they each have two long aisles of crazy, funky jewelry stuff. All I have to do is figure out how to attach them, but that shouldn't be too hard. I'm thinking maybe I cut out a hole in the leather and put the ornaments beneath them and glue them on. Who knows?

Tonight I am going to spray paint the grommets pewter and then work on my Clockwork Droid vest. Really wish I had the trim, though. Stupid JoAnn fabrics for not ordering more after I used it up last time!