Sunday, August 25, 2013

Eowyn Victory Dress Part 7: Accessories

This post is going to be short and sweet!

Eowyn's wig:  Something you may not realize: shopping for a wig online is INSANELY difficult!  I bought one that seemed perfect, and not only was the color totally wrong from the photo (it had streaks of brown), it wasn't the same shape, either.  I had to send it back.  I purchased the Cassie wig from Amphigory, which was about $30.   I purchased color 24B (which is not the color in the photo).  I found out about this wig from a Cosplay Island Eowyn costume.


Eowyn's shoes:  The shoes for the outfit can be seen in only one shot of Miranda Otto walking to set.


I bought a $20 pair of ballet slippers from Payless, and spray-painted them gold.  I used Rust-oleum that I had laying around from repainting an umbrella stand, and it seemed to work really well.  I didn't want to spray the insides, so I put on a pair of old socks and sprayed the shoes while wearing them, let them dry for a few minutes, then slowly peeled the socks off.  It seems to have worked really well!  We'll see how they hold up after a night on the con floor.


Friday, August 23, 2013

Eowyn Victory Dress Part 6: Where Were We?

I haven't blogged all week because I've been working on a lot of little stuff here and there.  It's too much to put into one post, though, so let me start with Eowyn's jacket and front panel.

I really put off making the sleeves because, frankly, they scared me.  After draping a few times and making several tests, I did finally buckle down and make a pattern.  I used the sleeves from Simplicity 4589 as a starting point. 


Here's the pattern that I made:


I cut out the lining and the actual fabric and found out ... I was like two inches too short with the damned fabric.  NOOOOO!  I don't know how that happened.  Oops.  Anyway, the sleeves of the jacket are now just a tad too short.  I may have to adjust the sleeves on the dress so that they're not too long.

I also added in the piping.


It's not puffy like that anymore, it's sewn down.  I do need to tack it in a few places so that the lining doesn't droop.  I am a bit disappointed at the weight of the sleeve.  I feel like it doesn't sit correctly due to all of the crazy embroidery, and it doesn't have the weight that I really wanted.  Oh well.

The other thing that I worked on this week was the front panel.  I couldn't find any trim that would work for the seams down the middle.  I tried to simple make seams, but you couldn't really see them.  I ended up buying gold organza ribbon from Hobby Lobby.  I think it works okay.


I then beaded the four rows of gold beads and the pattern down the middle.  I haven't done the embroidery yet, but that's not a priority.  If someone comes up and is like, "where's the silver embroidery?" I'll just smack them.  I am pretty pleased with how this came out.  I had a really hard time finding beads that I thought worked.  I ended up just grabbing a bunch of different stuff from Hobby Lobby.  It's not exactly what I wanted for the green beads, but it'll do.


Tomorrow I'll be placing the front panel on the jacket, attaching the sleeves to the jacket, and putting on the belts and finishing up with the zipper.

Here's a reference shot of the front panel detail for comparison:


Friday, August 16, 2013

Eowyn Victory Dress Part 5: The Dress

I had planned on writing this blog much earlier in the week.  And then something bad happened, and I didn't sleep all weekend, and all the work I ended up doing over Saturday and Sunday had to be ripped out and remade, and then I got really sick because I hadn't had a good night's sleep for four nights ... but tonight, I finished the dress (except for the hem and serging a few seams, because I need a second pair of hands to help me with the hemming, and I'd rather serge everything at once).

Here is the reference shot:


The dress should have been a simple build.  I used a combination of my two favorite Simplicity patterns (4940 and 9891).  As I have obviously used both patterns multiple times, I wasn't worried about the fit.  I modified the front panel so that the neckline was correct.  I decided early on to simply make a gown and not a separate bodice, because no one was going to see anything from the hips up.


It looks pretty good, right?  WRONG!  Honestly, I don't remember what I didn't like about this because I was hopped up on Dayquil, but I had a freaking meltdown when I put it on.  I think the entire front poofed up or something.  I spent the next few days readjusting the bodice.  Also, I had gold piping on the sleeves, but then I realized later that there is no gold piping on the dress sleeves, only the jacket.  Argh.  So THAT all got ripped off.  As for the rest of the dress, I wasn't going to remake the entire thing because I wasn't about to start dying fabric again.  Luckily, I had JUST enough fabric left to make a bodice, like the dress is supposed to have.  Also, I don't have a shot with the sleeves, but they were WAY too long.


Using the pattern I'd made for the jacket, I made a new bodice.  I wasn't too happy with my original shaping, so I reshaped the neckline to make it a more gradual angle, and then made the neckline a little more pronounced.  I tried it on several times to make sure it would work.  Because the original costume has blue trim along the edges and I didn't really feel like worrying about that, I simply sewed about 3/8" from the seam to give a textured look.  I think it works.


I then pinned it in a very general manner to the original dress to see where it should lay.  After trying it on about six times, I was finally happy and sewed it on.  Believe me, cutting off the original top was very difficult to do!  I mean, if it didn't work, I was screwed.


 I think I may have dropped the waistline about 3/4", but unless you are paying a lot of attention, I don't think it's noticeable.


The final step was to add the buttons in the front.  I used these buttons from JoAnn's and painted them light blue by mixing together a variety of paints I had laying around.


I finally attached the buttons down the front of the bodice.  They don't lay totally straight because they have such a big stem to them, but they'll do.

And tonight, I realized that the shoulders weren't sitting correctly, so I ended up taking about an inch off of them.

Let's just keep something in mind here - NOTHING FROM THE WAIST UP WILL BE VISIBLE.

I'm hoping to finish the majority of the jacket and front panel tomorrow so that I can get started on Matt's Eomer tunic.  I'm so glad the dress is done.  It was much more of a headache than I would have liked!


Tuesday, August 6, 2013

Eowyn Victory Dress Part 4: Piping

The trim along the sleeves of both Eowyn's jacket and dress is gold piping.  I couldn't find any at the local shops, and I wasn't going to go all the way to Vogue or the fabric district to find piping.  Plus, piping is about $2.50 for three yards, and I need a LOT of it.  There was some on eBay, but again,  too much money and waiting. 

So, for the first time, I made my own.

I bought one yard of gold metallic material from JoAnn Fabrics.  With my 40% off coupon, it was about $2.50.  I used 1/8" cotton cording from Home Depot.  It cost me just under $5.


I cut the fabric into strips just over 1" wide, then pinned it along the cording.


I sewed it with a medium length stitch so that it would be easier to rip when finishing the ends.


I sewed as close to the cording as I could without sewing through it.  Because the material is so slippery, it was bunching up a little as I sewed, but if I didn't catch the cording, it would stretch back out.


I finished with about 35 feet of cording for less than $10.  The only thing I didn't realize is that when I went back after putting all of the material on to sew over the edges and prevent fraying, the very act of sewing made it fray more.  I guess I should have sewed the edges as I went along.  It's okay: if it's not usable, I can remake it.  It only took about two hours to make.


Friday, August 2, 2013

Eowyn Victory Dress Part 3: Jacket Front Panel

I still don't know what to call this darn thing.  It must have an actual name.

So, the jacket has this really cool embroidered detailing over it.  I started drafting it the other night. I'm a bit annoyed that we don't know what the back looks like.  Is it just the front panel, or does this detailing go down over the back at all?  Oh well.


I made the jacket bodice mock-up out of white muslin, so I used scraps from Shadow Weaver to make the front piece and belts for contrast.


 I made some adjustments, then made another mock-up out of the original brocade I'd purchased for the costume.


It's just about right, so I made the patterns with seam allowances.  There will still be some adjustments to make with how the belts lay on the sides, but I think I'm about 95% done with the fitting for this.  I won't know for sure until I finish the base of the jacket, which won't be until I figure out what to do about the sleeves.   I also made the base of the jacket longer.  It can always be trimmed.


Patterns pre-seam allowance

The embroidery for this is going to be the trickiest part.  I won't be tackling that until the base of the panel is completed.

Here it is with the actual fabric I'm going to use and the jacket mock-up.  It still needs some adjustments, but overall, I'm pretty happy with where it is at the moment.


Thursday, August 1, 2013

Eowyn Victory Dress Part 2: The Jacket

Yesterday I dyed the fabric for the jacket, and today I worked on drafting the pattern.  For the bodice of the jacket, I used Simplicity pattern 4940, which is a pattern that I turn to for a lot of projects.  In addition to the gown, there is a separate bodice pattern.  It's actually two pieces, so I had to alter it into one piece.  I did make some other adjustments, including lower the bottom of the bodice (I still have to make it a tad lower).  I do still need to work on the sleeve area, as it doesn't fall quite right with the drafted sleeve.

The fabric is a gold metallic brocade from JoAnn Fabrics.  I dyed it in my washing machine on the medium load setting with 2 tsp Teal and 2 tsp Evening Blue Rit Dye.  I think it turned out pretty well!  After careful consideration, I decided that the best thing to do was to make the next draft of the bodice out of the actual fabric.  The reason for this is that the fabric is a lot stiffer than the muslin, and I wasn't sure if it would lay the same way.  Luckily, I have about 16 yards of this stuff, so as long as I work with the same pieces over and over as I make my adjustments, I'll have enough to make more.

Here is the base of the jacket, both front and back.


The sleeves really had me confused for a long time (and I can't say that I'm NOT confused by them right now).  First, they are split in the front, which is actually more difficult to figure out than it seems.  Second, there aren't many reference shots of the sleeves, and they're not very good quality, so the shaping, the length, and the cut are difficult to discern.


After trying to modify one of my sleeve patterns, I decided to attempt draping.

But first, because my only reference photo of the length and width of the sleeves is of Miranda Otto from the back, I had to make a duct-tape dummy of just my bent arm.  I pinned this to my mannequin so I had a shape upon which to build the sleeves.


This is only a start, but I am heartened by how it went.  I think if I can use one of my sleeve patterns to do the shoulder area, I'll be able to use the sleeves that I formed by draping to make the rest.

Draping - Rear View

 And here's the sleeve sewn onto the bodice.  There is a lot of material that I have to remove under the arm and figure out how to do the split a little better.  I also feel like it needs to be slightly wider.  Also, the sleeve isn't actually that long, but I haven't figured out long they need to be.  I need to be in the proper shoes, first.


So, that's where I am now.  Tomorrow I'll post about the front panel (front piece?  What do I call that?)  I actually worked on that the other day.  Because so much of it requires trim and beads and embroidery, I'd like to get the base of it finalized this weekend so that I can start the detailing.  I ordered all of my lining yesterday, so I'm hoping that I'll be able to finish the under dress next week.

Tuesday, July 30, 2013

Eowyn Victory Dress Part 1: Fabrics

I've started working on Eowyn, and before I get too far along, I want to start posting about the build.  So, let's start at the very beginning ... fabrics.

I looked everywhere online and in stores to find something similar to the fabric used in the Victory Dress.  I'm pretty sure it's a dyed Indian fabric, as that seems to be what most of the dresses in LOTR were made from.  The costume is made out of two parts: a dress and waist-length jacket.  There are three different fabrics used, as there is a frontpiece to the jacket (I'm not sure what it would be called).

The Dress:  

As you can see from the picture below, it has a really nice texture to it.  I couldn't find anything in a uniform color (so that it would dye evenly).  Also, all of the embroidery on these types of fabrics (that I could see in the store, at least), was metallic, which just won't dye.


I did find this Bridal Inspirations white satin fabric at JoAnn Fabrics, then dyed it.  


I agonized over the color - I really did.  There are a few production stills of this dress, and it looks to be a different color in almost every single shot.  In some photos, it looks like a light grayish-blue (the same color as the accompanying robe that I made). 


In some photos, it looks like a much richer blue.  And in some photos (like the close-up of the sleeve), it has a much greener tint.  Part of me really wanted to do the much richer blue, but I decided to go with the light blue.  Using the Rit Color Formula Guide and several experiments, I finally settled on blue-green #208.  Unfortunately, the fabric didn't hold the color as well as I wanted, so I dyed it a few times.  I couldn't tell you what my ratio ended up being.  Luckily, I dyed all of the fabric all at the same time to make sure that the color would be even.  But still, my modern, digital-readout washing machine is NOT made for dyeing - it refuses to simply soak or agitate, it INSISTS on going through every cycle in order, and if you try to stop it and start the agitate cycle again, it first empties all of the gorram water.  There really is something to be said for my grandma's old machine with the dial.  Sigh.


I'm quite pleased with the final product, especially as this is my first time dyeing fabric on this scale.  I did end up with about two yards of the ten that didn't dye quite as deeply as the rest, and I'm not sure why (but I blame the machine).  Because there were a few dark spots from where the dye sank in too much and some of the fabric was unusable, I had to use those two yards to make the back part of a sleeve.  It's a little too white, but unless someone is looking really hard, I don't think they'll notice it.  Also, because the fabric is super duper shiny and almost completely negates the blue (it makes it look too silvery), I decided to use the wrong sides as the right side.
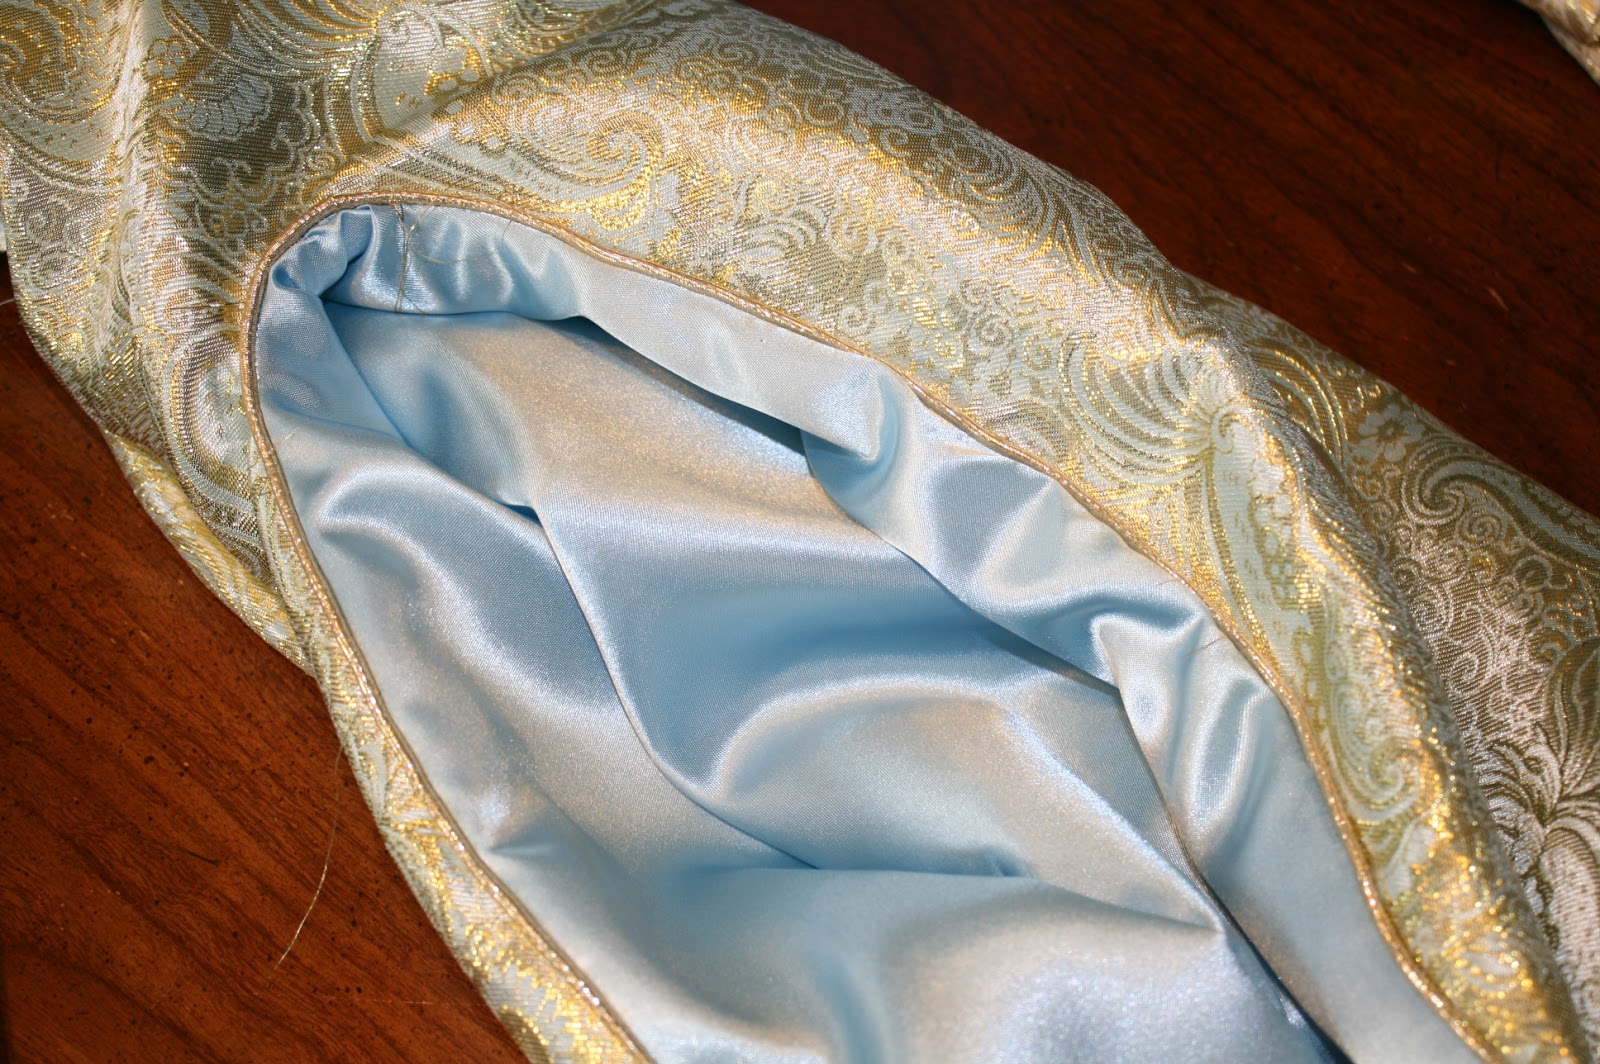


The Jacket:


This is another fabric that is just absolutely gorgeous.  It has gold embroidery, and I had a really hard time deciding what fabric to use.  After a LOT of deliberation and searching of online fabric stores, I settled on the very first swatch I had purchased: a Gold Metallic Paisley Brocade, also from JoAnn Fabrics.


The sleeves for the jacket are LOOONG, so I thought I'd better buy a bunch of fabric.  When I went back to the store to buy more, though, they were out!  When I checked online, it said that the fabric was out of stock, and the store in Naperville, about a half hour's drive from here, was the only one with any stock left.

As I was on my way to Naperville, I got a call from my husband that he had hurt his foot on his run, so I had to go pick him up (he claimed he could make it the three miles home, but I wasn't going to let him walk three miles on a foot with an unknown injury!)  By the time I'd dropped him off at home, I only had 45 minutes until closing.  I booked it over there and got my fabric (an entire bolt!) about 15 minutes before the store closed.  There were a ton of women buying loads of fabric.  (Who decides at 9:45pm that you need to buy one yard of 12 different fabrics?  Apparently half a dozen people.  Insanity.)  Anyway, after getting my fabric, I was standing in the l-o-n-g line at the checkout holding the bolt, and the women in front of me started tittering to each other.  Finally, one turned around and said to me in a haughty voice, "You know, you need to have that cut!"  A few others agreed with her: "Yes, you have to take that to the cutting counter!"  "You can't have that cut at the register!"  I gazed at them all, lifted an eyebrow, then coolly held up my yellow cutting ticket and said, "full bolt".  It was one of my cooler moments.  They all stumbled over themselves to apologize and one of them made a ridiculous remark about how people at Wal-Mart usually don't know that they have to go to the cutting counter.  The busy-bodies stood there quite uncomfortably until it was their turn at the register.  Take that, Napervile!

I haven't dyed this fabric yet, because when I did the test on the swatch, it was REALLY dark.  I'll have to start very light with this one and then gradually dye it.  (Oh, yeah, and the stupid fabric is back in stock - I didn't have to rush over to Naperville that evening.  But, you never know.  I've had more bad luck with fabrics going away and never coming back in the middle of projects.) 

The Frontpiece:

I originally purchased another brocade for the detailing of the jacket bodice, but I decided tonight that it had too much red in it.  I will now simply use the gold metallic brocade, and to just not dye it, or, if I do, to dye it a very light yellow (only because I think that the white may be WAY too glaring).


So, that's it for now.  I already have the main part of the dress finished (I don't want to put the sleeves on until I get the lining because I want to sew the lining to the sleeves at the bottom).  I just got my lining swatches, so I'll be purchasing the lining from Fabric.com tonight.  I've drafted the jacket bodice and frontpiece, and now I'm actually about to go work on the jacket sleeves, which are turning out to be a bigger pain than I thought they would.  So, stay tuned!  I'll be working on this costume pretty extensively this week, so I'll be (hopefully) updating the blog often.