Thursday, December 2, 2010

1950's Dress

My cousin got married on November 20, and since I make gowns for the weddings I attend, this was a great opportunity to show off my favorite colors.  I love fall, and I love long dresses!  I was inspired several months ago by the film "Indiscreet" with Ingrid Bergman and Cary Grant.  I absolutely loved the necklace that Ingrid Bergman wore, and I love the style of dresses that she wore throughout the film as well.


However, I DIDN'T like the dress that she wore with the necklace, it seemed too "bridesmaid" to me.  So, I instead found a 1950's Retro pattern - B4918 from Butterick.


I wanted a burnt orange color for the dress, but I ended up with pumpkin, as it was the darkest orange I could get anywhere.  For the top I decided to go with brown velvet; I went with velvet instead of satin to add a warmer look to the dress.  I also did away with the really cool drape over the shoulder since this was for the end of November, and instead I made a shrug out of the same brown velvet material.

At first I really hated the dress, as it just seemed so big in the waist due to the yards and yards of material gathered there, but after cutting out the excess material in the seam, the dress really settled down and fit me well.  I added straps because despite cutting the pattern to my size (16 in the waist and 14 in the top) I still had to cut out four inches (FOUR INCHES!!!!) from the bodice in order for the dress to fit properly.  And then, the weight of the skirt (it had a 15' circumference!) was dragging the bodice down.

Here is the final product!  Check out the necklace - I commissioned it from my friend Pam.


I bet if my waist was as tiny as the waists on the models in those sketches, I'd look even better!

Sunday, November 28, 2010

My First "Real" Award!

I won Best Original/Homemade Costume for my Susan costume at my work party a few weeks ago (got a $100 gift card to Target), but last night I won my first "real" award!

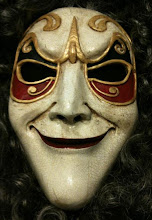
I went to ChicagoTARDIS at the Westin in Lombard, IL, dressed in my Clockwork Droid costume.  I decided at the last minute to enter the Masquerade, and let me tell you, that was the most daring thing I've done in a long time.  Wearing a mask helps (I also wore it to get an autograph from Gareth David-Lloyd, who plays Ianto Jones on Torchwood).

This was my first real costume contest ever, and boy was I a nervous wreck!  Thank goodness I hadn't eaten in about eight hours, or I'd have been puking in my very, very hot mask.  We entered backstage through the kitchen - now I know how the stars feel!  (I also stood right next to the rack of coffee makers that Gareth David-Lloyd brought out on stage as his "appliance" during his panel.  God, I've become such a fangirl!)  While we were hanging out backstage, I'm pretty sure that Tony Lee, one of the writers, was back there.  It was hard to see in my mask, though.  The script that the MC read was, "The clock on the mantel is broken!  Straight from the spaceship Madame de Pompadour, this clockwork droid is in search of replacement parts."  Matt says I walked across the stage a bit fast, but the CWDs do walk fast.  I did stop and do a few poses before walking off.  Also, when we were at Dragon*Con's Masquerade and people were up there forever, it got very tedious.

Anyway, when they announced the awards, there were all kinds of silly awards, like "Best Use of a Banana" (given to the Tenth Doctor and Rose).  I ended up sitting next to them, and I thought that was pretty funny because the banana was from the same episode as the CWD ("Girl in the Fireplace").  But then they announced the winner for "Best Workmanship - Novice", and I was the winner!  How exciting!  I also got to stand about 10 feet away from Ian McNeice (who played Winston Churchill in the last season).  He had been one of the judges. 


Yesterday was one of the best days ever.  I met Ianto Jones, (he said, "you are SPOOKY" and shook my hand like he was afraid to), entered my first Masquerade, and won the Novice division!  I'm so thrilled!

Thursday, November 18, 2010

The Lion King

Last night my mother-in-law and sister-in-law took me to see The Lion King in Chicago for my birthday.  It was amazing, especially for a costumer like me!  I wasn't too impressed with some of the singing, and I think the audio wasn't balanced correctly a few times (I could barely make out the words) but the costuming absolutely made up for it.

I'd heard from day one that the costumes in The Lion King were breathtaking, and sitting in the second seat from the aisle, I was able to look at the costumes in detail as the cast walked up to the stage.  At one point the hyenas were all coming down the aisle - they were SCARY.  I said, "oh god!" and one hyena turned and yelled "BOO!" right in my sister-in-law's face!  We both jumped a mile.  Totally awesome.


So now I want to make a hyena costume for a future Dragon*Con.  It will be REALLY complicated, so I don't know if I'll ever actually attempt it.  But I'm definitely tossing this idea around, trying to figure out what I'd need to do, what materials I'd use, etc.   I wish I could show how the hyenas look from the side - they are just amazing!

Matt pointed out that Dragon*Con is a scifi convention.  I so do not care.  These are COOL!

Monday, October 4, 2010

Mini-Aqua Georgette

It's been a while since I've taken a good look at my Aqua Georgette dress.  I pulled it out today to look at how I constructed it, and boy, while I'm impressed at how well I put it together for one of my first costumes, it sure isn't as great as I remember it!  However, I was reminded of how much I love the fabric I used on the outer layer.  Oddly enough, I didn't like the way that actual georgette fabric flows, so I went with this other fabric instead.  All I can remember was that the name was lamb-something - I cannot find the fabric anywhere, and I literally purchased the rest of the bolt when I found out Hobby Lobby was discontinuing it, just in case I messed up and needed more (and I did).   It's gorgeous - I made both the Aqua Georgette and Lisa's Princess Leia dress out of the same type of fabric.  It's the perfect color and it just flows like nothing else.  It's almost like a really high-thread count chiffon.

Anyway, I've got to figure out what kind of fabric it is.  I've never seen anything like it anywhere else since I purchased the bolt from Hobby Lobby.  And - I mean - it's Hobby Lobby.  It's not like they're a specialty fabric store!

So I'm hoping I have enough of the lamb-something material left to make the outer dress for this mini-Aqua Georgette that I'm making now.  I don't have enough left to make anything for myself, but I do have a few large pieces that I think will be enough for the girls' dress.  If not, I'm sure I'll find a reasonable substitute.  But I sure would like to figure out what this fabric is!

Here is the first layer of the mini-Aqua Georgette made out of a thick, low-shine satin.  It's obviously not the right shape yet, and it's very long.   I'm going to size it against the mini-Padme soon and then shape it where needed.  I did make it bigger so that it will be wearable for at least a year or two.  Also, it will close with velcro that can be removed as the dress needs to be made bigger.  I don't know if I'm going to make the sweetheart neckline or not - obviously this is for a little girl and not a woman with shape!  The outer layer will be a piece of cake after that.

Friday, October 1, 2010

Another commission!

I got another commission for Halloween 2010 - the Aqua Georgette dress from Star Wars Episode II.  It just happens to be one of the dresses I've made!  It's for a friend's five-year-old daughter.  I think it's pretty funny that out of the two costumes I've made for others, they've both been Star Wars outfits (the first was a very, very basic Leia costume).  I luckily have a lot of material left over from the original AG costume, so I'll be using some of that for the dress.  I even have all the lace left over, so she'll be getting essentially a duplicate costume!  I'm very excited to get started on this dress, and will probably start working on it over the weekend.  I'll obviously be using a different pattern for this - Simplicity Pattern 5520.  It has the best cut out of the patterns available, and seems to be the most easily manipulated.

Wednesday, September 15, 2010

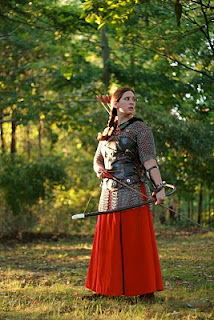
Queen Susan Photo Shoot

And here are a few photos from our photo shoot this weekend!

Wednesday, September 8, 2010

Dragon*Con

Wow.  I don't even know where to start.  But definitely make sure you read the last two posts that describe the final bits of my costume.

Dragon*Con was beyond amazing.  I'm not sure I've ever had so much fun in my entire life!  We went to a few Doctor Who panels, a few costuming panels, and the Kaylee and Simon panel.  I got a smile from Morena Baccarin, Sean Maher ran past me in the hallway, and I videotaped an interview with Frazer Hines who played Jamie from classic Doctor Who.

I've never been such a center of attention before - my Clockwork Droid costume was amazing.  I was photographed a couple hundred times!  I'm totally in love with getting up and having everyone tell me how awesome I am, hopping from party to party while people scream, "Clockwork Droid!"  I overshadowed the Tenth Doctor a bit, but at least I didn't have a drunk girl caress my face and tell me how gorgeous I am.


Susan wasn't received as well, but that's okay.  I'm not 100% happy with it, but I already know what adjustments we're going to make.  I know it looks fantastic, but it's not as fantastic as I'd like ...

Chain Maile Top

The chain maile top was the hardest part of the chain maile by far. I started out by making a front and a back, with two pieces that draped over the shoulders. That was too much, so we ended up with just the shoulder pieces.

I also made two sleeves. I had to split the sleeves on the bottom, otherwise I couldn't get the top to connect with the shoulder pieces - it was too tight.

This was just so hard that I ended up not finishing until halfway through the day on Sunday at Dragon*Con!

So here's what I ended up doing: the sleeves are attached until about three inches below the top, then the top was spread out and woven into the shoulder pieces. This meant that the maile was essentially a teeny tiny shirt.

This was too hard to get over my head, so I had to split it down the front and then weave myself in. (The accompanying picture reflects that - it was a rush job, and since most of that is covered by either the collar or the corset anyway, I figured it didn't matter.)

I know that in the future I will have to add more rings to the front of the shirt. The front was smaller than the back (probably because my chest takes up more room than my back) and was pulling my shoulders forward, causing me to be in excruciating pain after an hour or so. (Once the maile was off, the pain was gone, with no lingering effects.)

I am actually going to remake all of the chain maile with smaller rings, now that I'm proficient at it. I will also make it so that it either weaves up the back or attaches with some kind of silver thread. That is a project for the future, though! Gotta still figure out how to fix those collars, too!

Here is the chain maile top:


And here is Matt sitting amongst all the different pieces of the chain maile we were working with to try to make the top!

Monday, September 6, 2010

Quiver

Matt totally made the quiver all on his own. Well, I did a little bit, but he did the most work. I think this is THE most phenomenal part of the costume!

We started with PVC that was about the right diameter. Holding it over a grill, Matt worked the plastic until he had widened the top a bit. He did this by pushing it down over a wine bottle. Then he held it over the grill again and got it to curve just a bit.

He sketched the pattern onto the PVC freehand, and then carved it out using the dremmel. It looks fantastic!


I then finished it off. I made a bottom using Sculpey - all I did was roll out a 1/4" piece and press the bottom of the quiver into the Sculpey. I baked it and attached it with hot glue, but then finished the edges with DAS clay. I then sanded down the clay.


I then spray painted the entire thing with ivory spray paint.

I then used the same technique from the vanbrace to make the pattern stand out - really watered down acrylic paint brushed on and wiped off. It was a bit too much, so I then went over the entire thing one more time with a very thin coat of spray paint. I also had to paint the SP - for Susan Pevensie - on the top of the quiver. I used metallic silver acrylic paint for that.


The last thing I had to do was attach the belt. I measured a regular belt from where it would attach on the quiver and attach on my person, then cut it. I drilled several holes through the leather so that I had several options - I could make the belt shorter or longer. I then drilled a small hole in the quiver and attached the belt to the quiver with a small screw.

Tada! Here is an original for comparison:

Thursday, September 2, 2010

Heading to Dragon*Con

We are leaving in about an hour for Dragon*Con. The Susan costume is almost finished. Yup, almost. It will have to be a Saturday costume and I'll have to finish the chain maile tomorrow at some point. It's only a small bit of work, but I need to finish packing.

I'm sorry, I just haven't had time to post about the quiver. Matt worked really hard on it, and I don't want to just gloss over it. It's the best part of the costume! I will post the quiver and the remaining chain maile when I return, along with pictures of me in full costume!

Wish me luck!

Tuesday, August 24, 2010

Susan's Accessories

Namely the bow and vanbrace.

The bow, as you may remember, is PVC that was heated with a heat gun and then shaped. Well, I had to finish it off. The tips of Susan's bow are supposed to be more ivory, but I just couldn't imagine shaping them out of the PVC. So instead, I used DAS clay, which is an air-hardening clay. No baking! It is much more difficult to work with than the Sculpey clay, which is what I made my Clockwork Droid mask out of. It doesn't smooth very well, and I had to do a second layer to make the shape even and get rid of naturally-occurring cracks. But, I think it looks pretty good. Using American brand acrylic paints, I painted the clay tips "warm white" - "ivory" seemed too white. The bow itself has vines carved into the ends, so I glued a strip of leather cord around it (too bad I couldn't actually carve it or somehow include the leaves). I did NOT worry about carving anything into the clay, since it was difficult to work with and I couldn't get a clear shot of the design, anyway. Plus, if someone's going to bother me about that when I've put so much tiny detail into other things, they need to get a life.


I also used the DAS clay for riser (where you hold on). In hindsight, I realized this is actually part of the bow, so I probably could have just painted it onto the PVC. Oh well. I then painted the riser a brick red. I also took a gold ribbon and glued that onto the riser for the gold bands.


The string is gold elastic cording that I found at JoAnn Fabrics. I used the same red paint for the riser on the string, then just tied the string around the bow. One reason I used the elastic cording was so that I can actually pull back on the string! I am happy to say that the bow is now complete!


The van brace wasn't tricky, just time-consuming. I had to make the leather brace and the ivory design as well. I was able to print out a life-sized version of the vanbrace, which I found in the book The Chronicles of Narnia: Prince Caspian: The Official Illustrated Movie Companion. I used that as a pattern and cut the van brace out of the same brown vinyl I am using for the straps on the corset. I then cut out another vanbrace of the same size, but then cut it down just a bit. I then sewed the smaller piece on top of the larger piece, leaving gaps where the straps needed to be added.

The straps are thin and fit between the two pieces of vinyl. There are supposed to be small buckles to hold the vanbrace in place, but I could not find anything that small in any of the fabric stores, and I didn't trust looking online for one this late in the game. Instead, I used 3/4" vest buckles. I attached the buckles to the vanbrace using a loop of vinyl. The straps themselves thread through the buckles and actually work quite well. The final thing was to design the pieces that fit around the thumb. For this, all I did was cut a piece of vinyl and wrap it around my thumb. I then cut strips off until I had the right shape. I then cut a piece to attach to the wrist and after attaching that to the main piece, I used the whole thing as a pattern for the actual piece. This is stitched to the underside of the vanbrace. What I don't show you in this picture is that to finish it off, I painted the underside a dark brown using acrylic paint. I actually did that after attaching the "ivory" design piece. I am very pleased with the result!


The other part of the vanbrace is the ivory decoration. I had no clue how to do this - I thought about painting it, I thought about somehow doing it with PVC - but finally, Matt suggested that I use foam. I got very thin craft foam for $.99 at Hobby Lobby. I cut out the shape using the pattern from the book. I then hand-carved the design using the end of a plastic paint brush. After the design was sketched, I painted the entire thing with the same "warm white" paint as the tips of the bow.

After the paint dried, I took a very light brown acrylic paint and mixed it with a bit of water. I then brushed that over sections of the design and immediately wiped off all the extra. It slowly seeped into the sketches and provided some nice detail. The last step was to sew the decoration piece onto the vinyl. It's not perfect, but I think it still looks okay.


Here are some original pictures of these accessories:


Friday, August 20, 2010

Clockwork Droid

Today I finished re-applying the trim for the Clockwork Droid overcoat. I also brought in the sides of the new vest and applied new trim. The next bit I have to do is to fix the mask - I was going to remake the entire mask, but I just don't have time for that (maybe for Chicago TARDIS?) I think in order to make the mask fit under the wig better, I'll take the dremmel and slowly sand off the bit that is sticking up. I'm hoping it works and doesn't end up splitting the mask!

The last thing I have to do is remake the pants. I hate pants. And these pants pull strangely across my hips and make the fabric sit poorly. But that's a last priority because it's a guaranteed headache!

Wednesday, August 18, 2010

More Corsetry

I've spent the last few days working on my corset (and weaving chain maile - I finally figured out how to link the chains - YAY!!!) I started out with just the plain ol' corset, but I needed to have all kinds of leather straps running across it. For the leather straps, I originally started out with the leather that I made the corset out of, but there wasn't enough definition that way. So, I purchased a reddish vinyl. Yes, I know, VINYL. But, it was way cheaper than the leather version and it was actually a better color, too. I cut out a pattern with my giant grid paper, but cut it slightly bigger than the piece so that I could fold the vinyl under to get rid of the rough edges.


I am ashamed to say that I used a hot glue gun to fold the edges under, but I had no choice. The other glue takes FOREVER to dry, and sewing just looked awkward.


I then placed the pieces where I thought they belonged on the corset and glued them using SoBo Premium Craft and Fabric Glue. These had to glue overnight before I could do anything with them.

I had several silver pendants that I purchased from JoAnn Fabrics. Matt drilled out the centers, and I stitched them on using very thin leather thread. The silver square I had to hot glue on. (In the following picture, I hadn't yet glued or stitched anything on yet.)


I then started work on the back of the corset. The tan strips of vinyl have to go over the shoulders and then attach in the back and some of the straps have to attach from the back to the front, so I had to put the corset on the dressmaker's dummy in order to get everything to fit correctly. Some of the straps will attach using velcro. If I permanently attach the strips, I can't get the corset on. And if I use snaps or something, that won't work if I need to adjust the corset. Some of the straps are attached to each other using a belt buckle (one side is permanently attached, the other side will attach to itself with velcro.) I am ashamed to say that I again used the hot glue gun, only because it's so much faster and the other glue takes so long that the pieces would have slipped out of place. When I have everything attached correctly, I will lay it out on the table and reinforce every piece with the SoBo glue.

The last thing I worked on tonight was I took rivets and flattened the top part that attaches into the leather. I then glued (with hot glue - yes, it should work fine for this part) that onto the leather. This way, the rivets are in there without actually having been riveted. After the grommets, the thought of riveting together all the leather and vinyl just about made my head explode! Anyway, here's the front of the corset partially completed (not all the rivets are on yet - I ran out of hot glue!)


I'm still working on the chain maile for the top of the costume, but that's coming along pretty well. I had to purchase another 3 pounds of rings, so hopefully they'll be here in a few days and I can start making chains again. It's going REALLY fast now that I know what I'm doing. I got the entire front done during two episodes of Doctor Who (which means some of that time was spent watching and not weaving.)

Also, I still need to figure out what to do with that dratted collar. Maybe once the chain maile is in place I can more accurately gauge how big the collar needs to be.

It's not perfect, but it's pretty darn close!!! It also looks less cheap when it's not illuminated by a flash. I'm still working on the back, so I'm not going to upload those pictures quite yet. Here is the original again for comparison:


Monday, August 9, 2010

Bow!

I FINALLY figured out what to do with the bow! The answer: PVC pipe. I found a terrific website on how to bend PVC: http://www.pvcworkshop.com/bendpipe.htm The trick is to not only heat it thoroughly, but also to fill the pipe with sand so that the heat is distributed evenly and the pipe is supported so that it doesn't kink.

I started out with a five foot length of 3/4" diameter PVC pipe, but it was just a little too wide. But, I used it as my practice piece. I nailed nails into a board in the shape that I wanted, took out the heat gun, and got to work. It took about a minute to get the plastic soft enough to shape, and it has to be heated in no more than about a 2-inch width, so this was a bit time-consuming. But, it worked perfectly!


Once I was done, I decided which end I liked best, flipped over the board, and drew an outline of that side of the bow. Then I flipped the bow over and outlined it on the other side so that the outline would be exactly symmetrical. Because the middle of the bow is straight, you can also lengthen or shorten the bow length, determined by where you place the bow for drawing the outline (I shortened the bow a few inches.)

I went back to Home Depot today and got another five foot length of 1/2" diameter piping, and it is the right size. So I set about shaping it again. An observation - when the heat gun is on, it smells like the popcorn air popper. And if you get too close to the plastic, it browns to a nice golden color, like a toasted marshmallow!


But now I have the bow in the right shape. I'm going to cut off the ends and shape it with some kind of putty or clay to get the nice pointed ends of Susan's bow. I'm very excited - the rest should go pretty smoothly. This was definitely the biggest obstacle in making the bow! And it cost $2!

And here's the original for comparison - mine might be a tad too big, but I don't care - it's freaking cool!


Also, I ordered my shoes today! They're the ones third from the left. They're not quite that color, but they're the closest I could get.

Sunday, August 1, 2010

Chain Maile

Today was kind of a bust. I'd made a form for the quiver last week. I used a giant styrofoam cone and whittled it down to the correct shape (which is an elephant tusk.) I then made a form using paper mache.


I was going to sculpt the quiver today using oven-bake clay, which I rolled out into thin layers with a wine bottle. It kind of looked like raw bacon or something. Disturbing, especially since we just had a pig roast yesterday.


Well, the clay was just not working. It was lumpy, it was stretching out, it just was not good.


So, I gave up. Matt suggested using fiberglass or something - I don't know, he'll have to tell me what to do. It's apparently what he used to make the form for his R2D2 dome. My biggest concern is that I have to be able to sculpt this, and I'm not good at sculpting. I need something that won't dry until I want it to!

Anyway, I gave up on the quiver for today and turned to the chain maile. Remember, I spent a long time making chains, and Matt spent a long time piecing those chains into sheets of maile. We ended up with two big sheets of chain maile.


What I did today was I split both sheets of maile into two sheets, so I ended up with four identical sheets of maile. I was trying to figure out how to attach it to the corset without 1) ruining the corset, and 2) making it look fake. Matt suggested hand sewing it to a belt, but I broke the needle on the first attempt and didn't even get it all the way through the belt. Then I remembered that I had an extra leather cord!

I wove the cord through the top row of maile, tying a knot on the last ring of each sheet to keep it in place so it didn't slide. This way it has enough body that it can move and ripple as I walk like a full shirt of maile, but it's not going to slide around. This will tie around my waist. And - ta da - I've got a maile skirt! (Click picture to view larger image!) I will spend this week making chains for the top and the sleeves!

Saturday, July 17, 2010

Corset

Argh! How did I not post the corset pictures? Bad, bad, bad!! I am so proud of it, too!

I spent last Thursday re-watching the first few episodes of Torchwood and working on my corset. To this day, I can tell you what I watched for each part of every costume that I made and every counted cross-stitching project I've made. For instance, my nephew's birth announcement was seaQuest and A Haunting. My other nephew's was made during the commentary from LOTR and Chronicles of Narnia, plus a few Disney movies.

Anyway, I crouched over my table downstairs and got to work on the corset. First I measured the grommets out 1.5 inches from each other, and marked it with chalk. I put all the grommets in, but then once the corset was stitched up, it was still WAY too big. I managed to cut the sides down to where I thought they needed to be, and I also needed to cut the top part of the back panel down. It was just too high. So that meant more sewing.

I figured I only had one more shot to get this right, and several grommets kept falling out of the first run-through, so I tried cutting the hole for the grommets first. I did this by putting in an un-painted grommet, then peeling the back off and taking the grommet out of the hole. Luckily, I had a gross to work with, and I only needed 45 at the most.

After I punched out all the holes, I put in the pewter grommets. A few have still fallen out again just due to the fact that they were a tad too close to the seam and couldn't lock right, but I managed to put new ones in that worked. If anymore fall out, I'll put a dab of glue on the next grommet before I put it in.

I laced up the corset using leather cording that I got at Hobby Lobby, and I think it looks GORGEOUS. It fits like a glove now! Please excuse the angle of the corset - I cannot get it to sit correctly on the mannequin just because it's so very hard to lace it up on that thing. It also laces up much tighter on me than on the dummy.