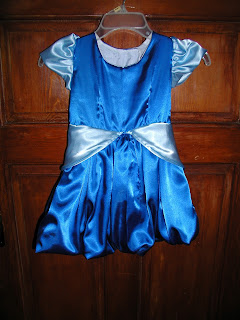
I used McCall's 5494. I made the dress in a size 5 so that it would be much larger than needed.

I could not find material that contrasted the way that I liked (actually, I did, but it was a half yard short) so I had to go with dark blue. I actually like it better, because it's still Cinderella-y without being too obvious. I wasn't planning on adding a zipper, so I sewed the bodice together at the top and both sides. The sleeves on Cinderella's dress aren't quite puffy sleeves, so to create the rounded effect of her sleeves, I stitched the sleeves in on themselves, attaching them to the seam.

I then created the skirt, which was a breeze, even though it's very heavily gathered. I made a nice white lining as well and sewed them to the bodice. I kept the skirt the full length, serged the bottoms of both the lining and the dress, and then sewed both to the lower seam of the waist. I stitched the lining in first (so that the right side stayed out) and then kind of enveloped the lining with the dress to create a kind of ballooning effect.
 |
| This is the bottom of the dress stitched to the lower seam of the bodice. |
The little side thingies - what the heck are they called; I keep wanting to call them papillions - were a PAIN IN THE NECK. I made them four times, I believe. The pattern is ridiculous. You make a little half circle, gather the straight edge of it, and then sew that to the skirt. The notches didn't match up, and I almost broke a needle trying to get through all those layers of gathering. So, I gave up and made my own. I made half circles that were 1" longer than the measurement of half the skirt. I made four of those and sewed them together. I then turned them right-side out and then flipped them upside down so that the straight edge touched the seam where the bodice meets the skirt, and sewed them to the bodice. I then flipped them back right side.
I think they look terrible, but after having made four attempts, I was done. (If it was for anything other than a dress-up dress, I obviously would have ripped AGAIN and started over.) The problem was that I didn't keep in mind that when flipping them back over, the "right sides" wouldn't meet in the middle anymore. And the lower seam where the two pieces are sewn together shows too much, I think. So, if you're ever going to make these dumb things, modify the modification that I did. Oh well - it's always a learning experience, isn't it?
After the dress was complete, I stitched several pieces of Velcro to the back of the dress. The soft side goes on the part that overlaps, while the hooks go on the part that lays directly against the back. I do this so that the dress can be altered. Yes, it's not gorgeous, but again, this is a dress-up dress. The stitches are wide and long - if she wears the dress when she gets older, her mom can simply rip out the farthest hooked piece of Velcro. The same goes for the length - the wide stitches can easily be ripped out to let the dress hang down all the way, or it can be hemmed to an appropriate length.

Here is the finished dress, front and back - the right side of it isn't really that long, I just straightened that side too much while leaving the other side ballooned. Also, it looks so terrible with the flash. I swear, I take the WORST photos of my costumes. I'm almost embarrassed to show these photos, as it makes it look like an 8th grade home ec kid made this dress. Something else to work on ...


