Here's the costume that I had to create: Dashi Dog. She's pretty adorable!
I used Simplicity 1704 for the pattern, and it was nice and straightforward. Have I mentioned how much I love being able to just make a pattern without modifying it?
I found almost all of the materials at Hobby Lobby. I know, I know. I'm boycotting them. Except, it's hard to boycott a store when no one else in the area has the colors that you need! Yay for 40% off coupons!
 |
| Skirt with interfacing |
The skirt was a light pink broadcloth. I originally was going to put interfacing on the entire dress, but after doing that, it was like HELLO SUPER STIFF NOT AWESOME. I pulled it off of everything but the skirt, which definitely needed the extra structure.
For the top of the dress, I cut off the bottom of the tan fabric and added a pink strip. I figured it was easier than trying to lengthen the skirt.
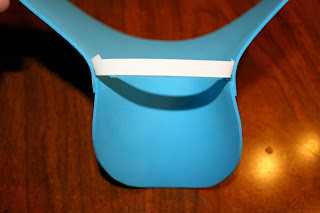
For the hat, I molded some craft foam around a measuring cup, then cut out a band from the same foam.
Those got glued together, and my husband paint a dark blue stripe around the band and the Octonauts logo on the top of the hat.
I insisted on making the hair for Dashi as well. I went through a lot of frustration over it, because it shouldn't be that hard! I made the Fruity Oaty Bar Girl heads completely out of the same fleece material! I finally ended up sewing two ears to a stretchy headband. Of course, I forgot to take any photos of it, but check it out in the final photo.
The final piece of the costume (which I almost forgot about, because I didn't know how to do it!) was the boots. My friend brought over a pair of winter boots, and I basically just covered them. Again, I used the craft foam, and I actually whipped these together in about 45 minutes.
Here are the materials that I used: one winter boot, one large piece to wrap around the top of the boot, and one piece for the toe. I figured out the shape by putting the foam around the boot and cutting until I had a basic shape, then trimming it up until it fit the way I wanted it to. The cut-out bit of the larger piece is off-center so that the ends can overlap. The pieces are designed to end right where the rubber sole starts. I was concerned about them becoming a trip hazard if they covered any more than that. The top of the covers also extend just a bit over the top of the boot.
I then put the toe piece on the boot, wrapped the large piece around, and tacked the corners of the toe piece with hot glue. I removed it from the boot and reinforced the seam a bit more.
Next, I added some elastic to the bottom of the cover. This is so that the boot can slip into the cover, but not move around once it's in place.
Finally, I added velcro so that the boots fasten on the inside of the ankles. I did this so that they looked nice and smooth when viewed from the side. Hopefully, they won't unfasten if she bumps one boot against the other. I used red velcro for that WOW effect. Okay, I used red velcro because that's all I had handy, and I didn't feel like running out to buy more when I needed a literal two inches.
Here are the finished boots!
Finally, here is a side-by-side of my niece with the original reference photo. She was quite excited to get the finished costume; there was a fair bit of jumping up and down and squeaking. I think she looks fantastic!


Love your Dashi costume. @casualcostumer Any chance you will make one to sell? My 4 yr old daughter wants to be Dashi for halloween this year, and they do not sell it anywhere!
ReplyDeleteSorry, I thought I replied to this earlier from my phone, and it looks like it didn't go through. You can email me at casual [dot] costumer [at] gmail [dot] com for more information. Thanks!
DeletePlease note that due to time constraints, I am NOT accepting commissions for 2015 Halloween. I will begin accepting commissions for 2016 in January.
DeleteThanks!
In addition, the cost for a Dashi costume is $50 plus shipping.
ReplyDeleteI found this too late. If you by chance find time to do one, please let me know. I've been asking my daughter for months and todatshe tells me she wants to be dashi lol.
ReplyDelete:-( You can always try it yourself!
DeleteStruggling with the hat -- any tips?
ReplyDeleteMade the dress and collar - worked beautifully, but help with the hat!
No problem! What specifically are you having trouble with? Shaping?
DeleteYes- the shaping! It's coming out more as an Anne of Green Gables floppy hat!
DeleteFeel free to send a photo to my email casual [dot] costumer [at] gmail [dot] com.
DeleteGonna try the boots tomorrow! Thanks for posting directions, yours look great!
ReplyDeleteAwesome! Good luck!
DeleteHow did you glue the hat together so perfectly? and Also how did you get the hat to stay on her head? My son is going to be Kwazii and he wears the same hat as Dashi.. two years after your post and octonauts are still a hit!
ReplyDeleteWe used bobby pins to attach it to the headband that the ears were on. If you're not doing ears, I'd suggest hotgluing on some elastic that would then go under your son's chin. Or a Ribbon/yarn to tie under his chin.
DeleteHi, I found this late too. Any chance you can make an adult Dashi? ��
ReplyDeleteSorry, I am unable to take any more commissions. You could try making it yourself, though! I'm pretty thorough with my build description.
DeleteHi
ReplyDeleteJust saw yr amazing dashi dog costume. My daughter is turning 5 in Feb 2017. She just loves the octonauts!
Are u still making these? If so, how can I order one and how much? I'm in Ireland.
Thanks in advance
Bernie
I am currently not taking commissions. Sorry!
DeleteDo you still make this?
ReplyDeletePlease email casual [dot] costumer [at] gmail [dot] com
Deletewill send an email
DeleteHi! Would you consider making this for my daughter for Halloween??
ReplyDeleteThank you for this tutorial! I see you are not taking commissions, so I am going to see if someone near me will. I appreciate the post!!! <3
ReplyDelete