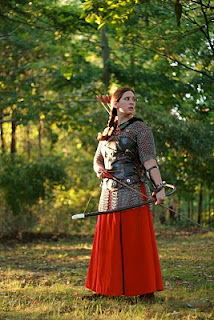
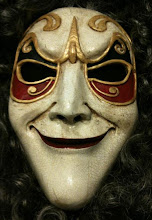
And here are a few photos from our photo shoot this weekend!
Wednesday, September 15, 2010
Wednesday, September 8, 2010
Dragon*Con
Wow. I don't even know where to start. But definitely make sure you read the last two posts that describe the final bits of my costume.
Dragon*Con was beyond amazing. I'm not sure I've ever had so much fun in my entire life! We went to a few Doctor Who panels, a few costuming panels, and the Kaylee and Simon panel. I got a smile from Morena Baccarin, Sean Maher ran past me in the hallway, and I videotaped an interview with Frazer Hines who played Jamie from classic Doctor Who.
I've never been such a center of attention before - my Clockwork Droid costume was amazing. I was photographed a couple hundred times! I'm totally in love with getting up and having everyone tell me how awesome I am, hopping from party to party while people scream, "Clockwork Droid!" I overshadowed the Tenth Doctor a bit, but at least I didn't have a drunk girl caress my face and tell me how gorgeous I am.
Susan wasn't received as well, but that's okay. I'm not 100% happy with it, but I already know what adjustments we're going to make. I know it looks fantastic, but it's not as fantastic as I'd like ...
Chain Maile Top
The chain maile top was the hardest part of the chain maile by far. I started out by making a front and a back, with two pieces that draped over the shoulders. That was too much, so we ended up with just the shoulder pieces.
I also made two sleeves. I had to split the sleeves on the bottom, otherwise I couldn't get the top to connect with the shoulder pieces - it was too tight.
This was just so hard that I ended up not finishing until halfway through the day on Sunday at Dragon*Con!
So here's what I ended up doing: the sleeves are attached until about three inches below the top, then the top was spread out and woven into the shoulder pieces. This meant that the maile was essentially a teeny tiny shirt.
This was too hard to get over my head, so I had to split it down the front and then weave myself in. (The accompanying picture reflects that - it was a rush job, and since most of that is covered by either the collar or the corset anyway, I figured it didn't matter.)
I know that in the future I will have to add more rings to the front of the shirt. The front was smaller than the back (probably because my chest takes up more room than my back) and was pulling my shoulders forward, causing me to be in excruciating pain after an hour or so. (Once the maile was off, the pain was gone, with no lingering effects.)
I am actually going to remake all of the chain maile with smaller rings, now that I'm proficient at it. I will also make it so that it either weaves up the back or attaches with some kind of silver thread. That is a project for the future, though! Gotta still figure out how to fix those collars, too!
Here is the chain maile top:

And here is Matt sitting amongst all the different pieces of the chain maile we were working with to try to make the top!

I also made two sleeves. I had to split the sleeves on the bottom, otherwise I couldn't get the top to connect with the shoulder pieces - it was too tight.
This was just so hard that I ended up not finishing until halfway through the day on Sunday at Dragon*Con!
So here's what I ended up doing: the sleeves are attached until about three inches below the top, then the top was spread out and woven into the shoulder pieces. This meant that the maile was essentially a teeny tiny shirt.
This was too hard to get over my head, so I had to split it down the front and then weave myself in. (The accompanying picture reflects that - it was a rush job, and since most of that is covered by either the collar or the corset anyway, I figured it didn't matter.)
I know that in the future I will have to add more rings to the front of the shirt. The front was smaller than the back (probably because my chest takes up more room than my back) and was pulling my shoulders forward, causing me to be in excruciating pain after an hour or so. (Once the maile was off, the pain was gone, with no lingering effects.)
I am actually going to remake all of the chain maile with smaller rings, now that I'm proficient at it. I will also make it so that it either weaves up the back or attaches with some kind of silver thread. That is a project for the future, though! Gotta still figure out how to fix those collars, too!
Here is the chain maile top:

And here is Matt sitting amongst all the different pieces of the chain maile we were working with to try to make the top!

Monday, September 6, 2010
Quiver
Matt totally made the quiver all on his own. Well, I did a little bit, but he did the most work. I think this is THE most phenomenal part of the costume!
We started with PVC that was about the right diameter. Holding it over a grill, Matt worked the plastic until he had widened the top a bit. He did this by pushing it down over a wine bottle. Then he held it over the grill again and got it to curve just a bit.
He sketched the pattern onto the PVC freehand, and then carved it out using the dremmel. It looks fantastic!

I then finished it off. I made a bottom using Sculpey - all I did was roll out a 1/4" piece and press the bottom of the quiver into the Sculpey. I baked it and attached it with hot glue, but then finished the edges with DAS clay. I then sanded down the clay.

I then spray painted the entire thing with ivory spray paint.
I then used the same technique from the vanbrace to make the pattern stand out - really watered down acrylic paint brushed on and wiped off. It was a bit too much, so I then went over the entire thing one more time with a very thin coat of spray paint. I also had to paint the SP - for Susan Pevensie - on the top of the quiver. I used metallic silver acrylic paint for that.

The last thing I had to do was attach the belt. I measured a regular belt from where it would attach on the quiver and attach on my person, then cut it. I drilled several holes through the leather so that I had several options - I could make the belt shorter or longer. I then drilled a small hole in the quiver and attached the belt to the quiver with a small screw.
Tada! Here is an original for comparison:

We started with PVC that was about the right diameter. Holding it over a grill, Matt worked the plastic until he had widened the top a bit. He did this by pushing it down over a wine bottle. Then he held it over the grill again and got it to curve just a bit.
He sketched the pattern onto the PVC freehand, and then carved it out using the dremmel. It looks fantastic!

I then finished it off. I made a bottom using Sculpey - all I did was roll out a 1/4" piece and press the bottom of the quiver into the Sculpey. I baked it and attached it with hot glue, but then finished the edges with DAS clay. I then sanded down the clay.

I then spray painted the entire thing with ivory spray paint.
I then used the same technique from the vanbrace to make the pattern stand out - really watered down acrylic paint brushed on and wiped off. It was a bit too much, so I then went over the entire thing one more time with a very thin coat of spray paint. I also had to paint the SP - for Susan Pevensie - on the top of the quiver. I used metallic silver acrylic paint for that.

The last thing I had to do was attach the belt. I measured a regular belt from where it would attach on the quiver and attach on my person, then cut it. I drilled several holes through the leather so that I had several options - I could make the belt shorter or longer. I then drilled a small hole in the quiver and attached the belt to the quiver with a small screw.
Tada! Here is an original for comparison:

Thursday, September 2, 2010
Heading to Dragon*Con
We are leaving in about an hour for Dragon*Con. The Susan costume is almost finished. Yup, almost. It will have to be a Saturday costume and I'll have to finish the chain maile tomorrow at some point. It's only a small bit of work, but I need to finish packing.
I'm sorry, I just haven't had time to post about the quiver. Matt worked really hard on it, and I don't want to just gloss over it. It's the best part of the costume! I will post the quiver and the remaining chain maile when I return, along with pictures of me in full costume!
Wish me luck!
I'm sorry, I just haven't had time to post about the quiver. Matt worked really hard on it, and I don't want to just gloss over it. It's the best part of the costume! I will post the quiver and the remaining chain maile when I return, along with pictures of me in full costume!
Wish me luck!
Subscribe to:
Posts (Atom)


