So, after a long time thinking about this, I've decided not to make the Eowyn Dernhelm costume. At least, not this year. I would like to concentrate on remaking my Susan corset with leather, and I'd like to wear it before I'm too old. Therefore, Eowyn's armor will have to wait. I know it is going to be extremely complicated, so Susan's corset will at least be practice.
However, I still want to make an Eowyn dress, so I'm thinking I may make the blue victory dress, since I've already made the robe. And while I wouldn't wear the robe to a convention, I love the color.
Although, I'm also throwing around the idea of making the brown shieldmaiden dress, which she wears as she gets Merry suited up for battle. I just don't know. It will probably come down to how many people have made each dress. I don't like to make costumes that a lot of people have made, or that have been made exceptionally well. I think that those of you who have followed the blog for a while know that I like a challenge, and I like being unique.
I've wanted to be part of the Doctor Who Fan Orchestra since I first heard of them, but I've never managed to sign up before due to Facebook being stupid and not showing me all of their posts. Well, I finally found out about the Christmas Carol (Suite) submissions on time. Of course, they said it was one of the harder pieces they've played. That's how it always goes for me.
Although I have kept up my piano playing since high school, I've barely picked up my viola since then. I definitely wanted to play the viola part, since I never played piano in orchestra. I was so worried because I don't read music very well, and I was always last chair in high school because I didn't care enough to practice (it's one of my regrets - how things that change when we grow up!)
All I can say is thank god for the click track.
I practiced for hours. I practiced until I thought this would happen. In fact, I can say with a fair bit of confidence that I put in more practice on this piece than I ever did with all the pieces I played in high school. Combined. In fact, I did what I do with most piano pieces: I memorized the entire thing (playing to the soundtrack in my headphones - I don't think I could do it without the click track).
I even took my viola, which actually was my mom's (or my aunt's - there is quite some debate about this) to be tuned up. They did all kinds of gluing and fixing and replacing, and when I got it back, I couldn't believe how rich and full it sounded. I was just about ready to film and record when I got a stiff neck. And I don't just mean my neck was stiff, I mean that if I moved it a millimeter from the strange position it had gotten stuck in (just picture me as if I were giving you THE LOOK), I was in blinding pain. I couldn't play for two weeks. I finally was able to hold the viola comfortably about three days before the recording was due, and the first time I recorded myself, I burst into tears. I sounded AWFUL. Now remember, I never was good, but geez. After two months of practice, you think I'd have been better!
So I recorded it dozens of times, and, being the talented editor that I am, I pieced together all the best parts until I got something that seemed passable.
When I finally filmed it, I decided that because I had memorized the whole piece, I could get away with playing as the Clockwork Droid. And you know what? It worked. I can't see words through the mask, so reading music was definitely out of the question. Because I couldn't see well, it was also difficult to bow on the proper part of the strings. Aside from two measures that I messed up (but it was okay, because I blocked my fingers with the music stand), I did quite well.
Here is the final product. If you haven't watched the other pieces that the DWFO has recorded, take a half an hour to watch them. They're not the Chicago Symphony Orchestra, but I think they're quite good for being a mish mosh of people from all over the world, playing without a conductor, playing without anyone else, with nothing more than a click track. I absolutely love it, and I'm so glad that I was able to be a part of this "performance". I am looking forward to participating the next piece, though I won't wear any costumes for that one.
The next bits of fun that we'll be working on is Eomer and Eowyn. Matt has already made the new chain maile for the top of my Susan dress, so I have to figure out if that will work just as well for Eowyn as well.
This is the outfit that I'm planning to make. This must be what going mad feels like ...
How will I have this done in time for Dragon*Con? Beats me. I may have to put Shadow Weaver on hold for another year.
And here's Eomer ...
We're both still trying to figure out what we'll make everything out of. I'm not sure if I'll do straight leather for Eowyn or not. All I know is that I'm going to take a short break from all this cosplay stuff so I don't go completely insane. Maybe after Christmas ...
This weekend was Chicago TARDIS, and this year was the best so far! We went for the full weekend this year, and I am so glad that we did. Friday was my birthday (also the anniversary of Doctor Who!) and I decided to leave work a half hour early so that I could get home, change, and get in the virtual queue for the Burn Gorman autograph session. Burn was so nice to every single fan that he met. He took the time to talk to everyone, and he seemed to genuinely enjoy himself. He had a smile on his face the whole time, and when he talked, he put so much energy into everything he said. There was a 10-year-old boy in front of me, and Burn didn't change his tone of voice, he just talked to the kid like he was an adult. It was fantastic! When I got up to him, I told him that Wuthering Heights is one of my favorite books, and that he nailed the part of Hindley in the 2009 Masterpiece Theatre movie. He smiled wide and said, "oh, you saw that!" He seemed so pleased, and he laughed and said, "I play a lot of asses!" He asked how I was enjoying my day, and I said, "Well, today is my birthday, so I'm having a GREAT birthday!" He wished me a happy birthday, commented that between Thanksgiving, my birthday, and Chicago TARDIS, I must have a lot of celebrating to do this weekend, and he also signed "Happy Birthday" on the photo. I'm excited that now my "Torchwood boys" autograph collection is complete.
After that I had to run home and go to my in-laws' pre-Christmas party, so that was all I did on Friday.
However, on Saturday, we went to Chicago TARDIS for the noon "Cosplay Support Group" panel. I was one of the panelists, as was a Captain Jack cosplayer that the Space Gypsies and I had seen at C2E2 singing "The Doctor and I" with John Barrowman. I had my doubts about the panel, since it was about what to do when your character leaves the show and 99% of the characters have left the show. I guess it went okay, though; there were a lot of discussions about various characters.
We went to a few panels, and then we came home for dinner and a costume change. It's so crazy to me - it takes us less time to drive to Chicago TARDIS, park, and go in the building than it takes us to go from our room in the Atlanta Hilton to the Marriott! After dinner, we headed back to the con for the Masquerade. There were some great costumes, and while the judges were conferring, Tony Lee organized a last-minute performance he used to do as a street performer called The Scarlet Blade. He selected people from the audience to play all the different roles - Captain Jack was the hero, a kid dressed as Rory was the sidekick, etc. It was unbelievably funny, because the hero was supposed to get killed at one point, but since Jack can't die, he kept popping back up. And the sidekick died a bunch, too, just like Rory. Everyone was fantastic, and I think it was the most fun I've ever had at a con!
After the Masquerade, we hung around for Toby Hadoke's (HAY-doke) new show My Stepson Stole My Sonic Screwdriver. It was funny and sometimes poignant, and I didn't even get all the jokes (some were about the classic series, some were about Britain).
Afterwards, we hung out at LobbyCon for a while as the Clockwork Droid and Captain John Hart and chatted with other cosplayers, including this fabulous Silurian who won the Masquerade! I should have taken my mask off to take a closer look at her mask. She looked pretty epic.
I always suspected Mary Poppins was a Time Lord.
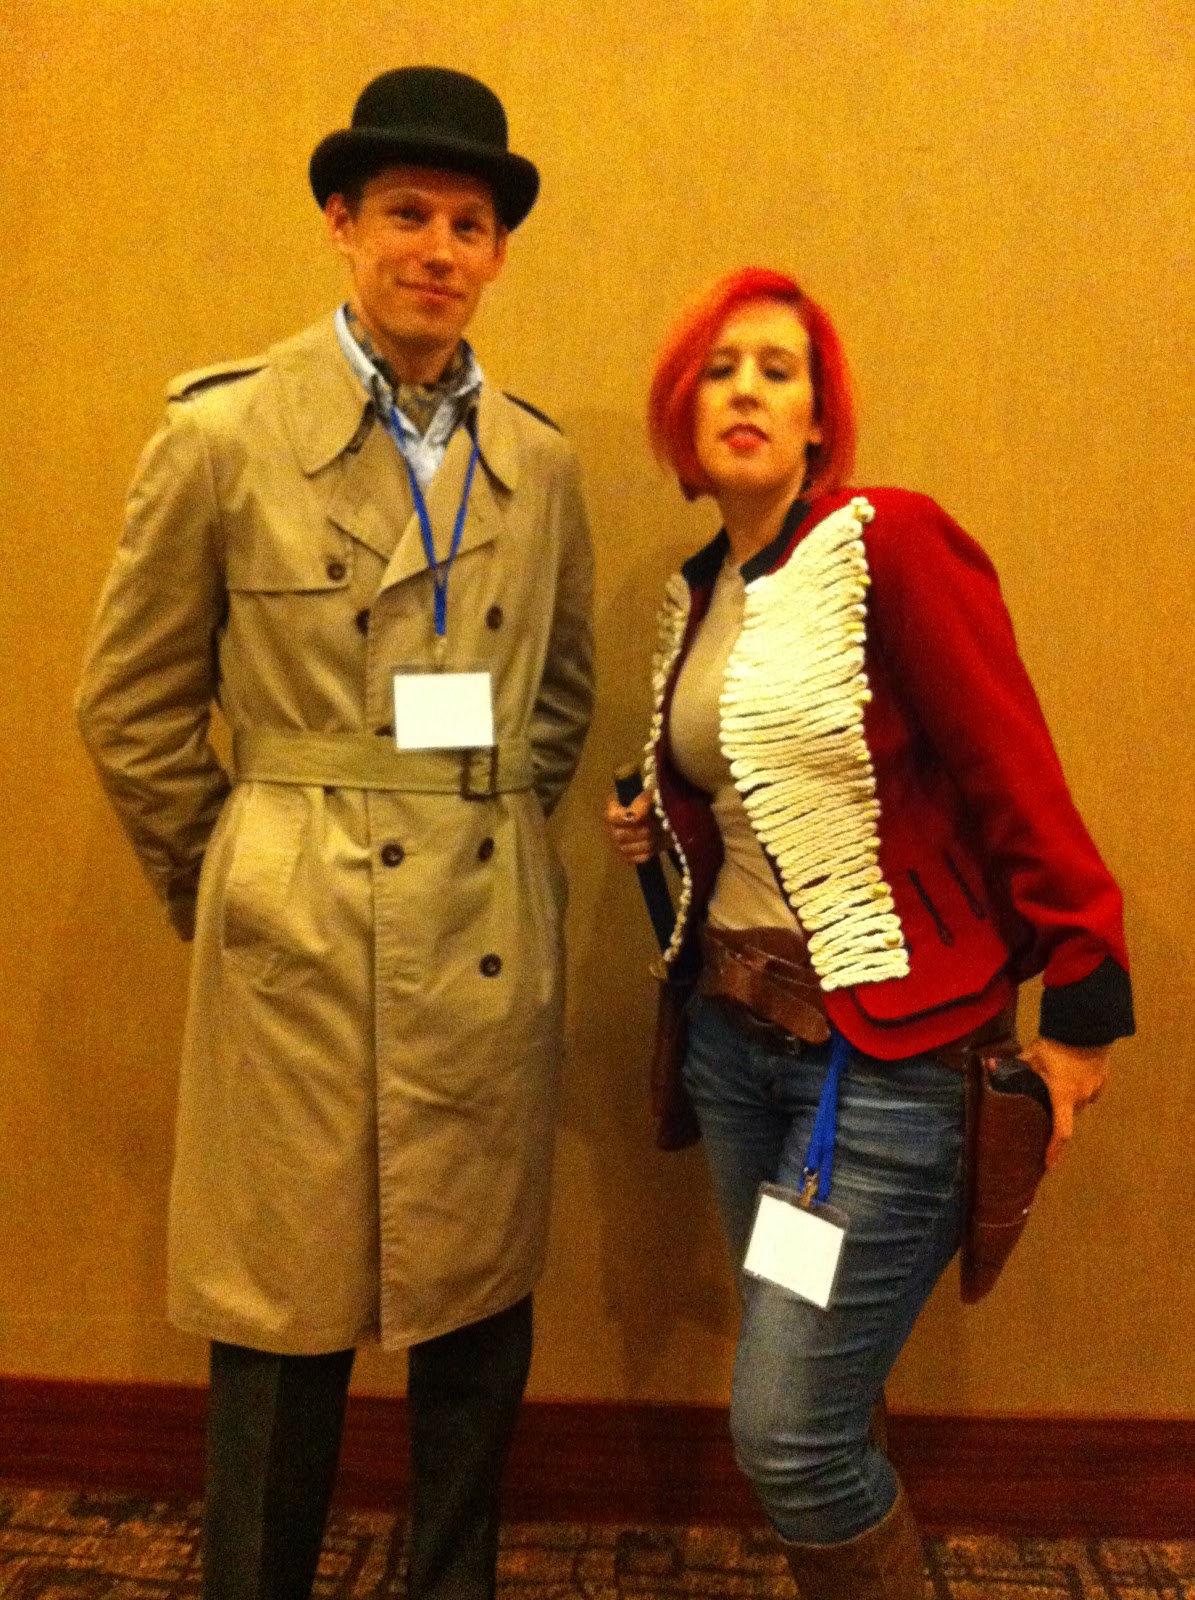
On Sunday we dressed up in our Inspector Spacetime garb again, parked, and went down to the lobby. The elevator doors opened upon Sylvester McCoy checking his smart phone. That was pretty cool, even though we haven't seen any of the Seventh Doctor episodes yet. Radagast! We hit a few panels, then went to get autographs from Tony Lee and Toby Hadoke. Tony loved our Inspector Spacetime costumes and snapped a photo; Toby chatted with us about Running Through Corridors, and how Rob Shearman spelled Matt's name wrong last year. He drew us a classic series Cyberman in response to the Dalek that Rob had drawn.
And that was about it! We had a great weekend! Here are a few more photos from Chicago TARDIS 2012.
The 11th Inspector and Femme Hart
Scarecrow from Family of Blood
The 11th Inspector meets his biggest fan!
Female Clockwork! We were in IS costume when we saw her, though.
I apologize for not updating earlier this week. My stiff neck really set me back, and I've been spending every second of my free time finishing my dress. While I finished on Wednesday, then it was Thanksgiving, and then it was the first day of Chicago TARDIS (and the 49th anniversary of Doctor Who, AND my birthday!)
The dress is finished now, but before I post a final picture, I'm going to go back and finish describing the construction of Constable Geneva.
I'm not sure if I made it clear earlier, but the majority of this costume is hand-stitched. The seams on the dress, the hem, and the seams of the lower sleeves are machine-stitched, but that's it. Everything else was stitched by hand.
As I said last time, I pleated four yards of organza for the sleeves, and they were in four parts, two that were just slightly more than a yard long, and two slightly less than a yard long. (I'd pleat until I couldn't keep the fabric tacked down anymore.) I stitched them together so I had two yards for each sleeve.
At this point, I decided to try the dress on so that I would know where to attach the lower sleeves to the chiffon. My husband was at work,
but I gave it a shot anyway. And I got stuck. The straps in the back
wouldn't let me get the dress off, and since I can't move my arms up too much, I couldn't pull the sleeves off of my arms. I absolutely panicked. I begged my husband to come home. (You should see the IMs that I sent him. In retrospect, it was pretty hilarious.) I wasn't even sure he'd be able to get it off of me. Luckily, he was getting off early due to the holiday, so an hour and a half later, he was home. I took the opportunity to ask him to help me figure out where to place the sleeves, and then with his help, I managed to wriggle out of it. I did rip the stitch out of one armpit, but it wasn't very good anyway, so I restitched it.
I then took off the straps and made new ones, then attached Velcro to the bottom ends and underneath the sequined trim. Of course, the second I move my arms, it pops off, so now I have to also use safety pins, but then again, it's not a costume if it doesn't involve safety pins ...
I then gathered the top of the sleeves so that they'd be the same diameter as the chiffon about midway up the arm, and hand-stitched the organza over the chiffon. In addition, I tacked the gold organza down onto the under dress.
I then attached the top of the sequined trim to the chiffon using a whip stitch. I had to be careful, though, not to let the stitches show. I left the bottom of the sequined trim unattached so that I could then sew the triangle trim to it. After stitching the triangle trim on (again, being careful because I could only stitch through the very top of the trim or it would show), I then stitched the bottom of that to the organza. I had to be very careful, because the ribbon wanted to scrunch up.
I then cut off the remaining chiffon and put Fray Check on the edges, since I couldn't serge it or otherwise stop it from unraveling. My friend told me about this a few months ago, and I flipping love it! It's just a clear glue that keeps the fabric from fraying, and it's not something you want to use on a visible part of the fabric, so it shouldn't replace sewing or serging unless you can't get to it. And, that often happens with my costumes, so it's come in handy quite a few times.
The last thing to do was to attach the rhinestones. If you look at the packages, I used the fourth row from the right. I actually used up all of the rhinestones of that size that I purchased. These had adhesive backs, so I first put them all on to make sure I had enough, and that they were spaced correctly. After being satisfied with placement, I started gluing them on one by one using Gem Tac. It dries clear, so even if you put too much on, you can't tell once it dries.
It. Was. A. Nightmare.
The stupid things just kept popping off. I'd barely touch them, and they'd all stick to my fingers. Then, the glue would start to dry on my hands, and the gems wouldn't transfer from my fingers to the chiffon. I ended up having to glue it in a few sessions, just because the gems I'd put on with the glue would sometimes pop off if I touched them. Finally, I got all of the rhinestones on. I have no doubt that I will be finding them for months in the carpet of my sewing room.
New straps
My mother pinned up the hem for me after Thanksgiving, and then this morning, I serged the hem. I hadn't planned on it, but it's just easier. My final addition to the costume was a cute little bag that took me about twenty minutes to make out of the lining and gold organza. And here's the final product!
I currently have one of the worst stiff necks I've ever had, accompanied by quite a bit of pain, so I've been working pretty slowly on Geneva the last two days. I don't have many photos, but I did want to post an update. I have a tendency to just completely fall behind if I don't make the effort.
Today I finished hand-pleating 4+ yards of organza. It only took me most of the Bears game last night and about an hour today.
I also hand-stitched on the trim around the neck. Tomorrow I'll finish
up the sleeves, and on Thanksgiving, my mom will help me hem. Hemming
is my one failure as a seamstress. I'm not sure I've EVER sewed a
straight hem.
That's all for now. I'll just leave you with this.
I spent most of the day working on the Geneva costume again, and I'm completely exhausted.
I started out working on the sleeves, which have been the bane of my existence this weekend. I finally managed to get them worked out, and I hand-stitched the upper sleeve to the dress and the bra straps. It took forever! I also finished shaping the lower sleeve and put seam stop stuff on all of the seams so I wouldn't have to worry about serging everything.
That all took me most of the day, but I'll admit - I was procrastinating.
Lower sleeve
Pattern for upper sleeve
This evening, I finally buckled down and laid out all of the patterns on the gold organza. Once I was satisfied that it would all fit, I made the first cut! It was incredibly nerve-wracking, but everything went well. I had lined up the patterns so that when I sewed the pieces together, the squares would all match up. I did "mess" one piece up, but it was no big deal. I could have just left it (there would have been two clear squares between the gold squares), but I had more than a yard left over, so I just cut another piece.
I sewed it all together VERY carefully.
Here it is so far (I haven't attached the lower sleeves yet because I'm not positive I like them yet). The only regret I have is that I would have been able to get the squares to slant inward more. I thought I had it all figured out, but when I put it together, it just didn't fall right. That's okay, no one will know. Well, except for all of you.
Here's the back - the chiffon helps keep the sleeves up. It's not perfect, but my hair will be covering most of it. The edges will be covered in trim, but that's the last step. Also, the chiffon won't stay plain for long. Tomorrow I'm BEDAZZLING!!! Yes, that's right - I found chiffon that would look good, but it was sequins, not rhinestones, and since I've been putting so much time, effort, and money into this costume, I decided to make it look right. Thank goodness for the Michael's gift card I have, because I'm not sure I could otherwise justify purchasing $30 worth of rhinestones.
I'll be finishing up everything else tomorrow. Good night!
I've been working on the costume for the last few hours, and thought I'd take a break to blog about what I've done so far today.
I went to JoAnn Fabrics this morning and purchased some organza to use as a mock-up. I worked on a few variations of the front of the dress to see how it would best fall with three pieces (center front, side front). With a three-piece front, I'll be able to cut out the organza so that it slants in, just like the original costume. In addition, the way that the fabric falls should pretty much hide the seam as long as I match up the squares correctly.
I also found the color for the under dress that I've been looking for, so I remade the under dress out of the new gold taffeta. I then made a mock-up out of the cheap organza and threw that over. I was pretty satisfied, so I finalized the pattern on new paper.
The back of the dress wasn't sitting tight across my back like I'd hoped, so I put in some darts on the sides of the back panel where the organza will cover them. In addition, I realized that I would need some support for the dress so that it was not solely reliant upon the sleeves and trim. In the photos from Community, a thin strap is visible, but it's either a bra strap or a strap made out of the same material as the under dress. Well, that just won't do for Ms. Perfection, so my wonderful husband offered to drive back to JoAnn's and buy some clear bra straps for me. I attached them to the front where the trim will cover them, and then ran them over the shoulder and attached them just to the inside of the darts.
The trim was completed earlier in the week. The trim on the top of the photo actually goes beneath the other trim on the sleeves. It's a wide brown ribbon (I believe 1.5") that I painted with gold acrylic paint. To make the triangles, I measured 1.5" inches down a 26" long piece of ribbon and marked it with a pencil, then connected the marks. The other trim, which I found at JoAnn's, is made out of sequins and will go around the neck and sleeves. It technically should be beads, but the only beaded trim that was passable was about $30 per yard, and if I'm going to spend $60 on trim, I'm going to hand-bead it myself in the correct pattern. And that's certainly not going to happen, so I'm settling for the sequins!
I'm going to go work on the sleeves now. I won't cut the organza until tomorrow, as I want that to be the very last step before stitching on the trim around the neck. Also, I'd like to have a VERY clear head when I do it, because I'll have to check everything about five times before I cut it. I'll probably hand-stitch all of the trim and organza, just so that I don't mess it up with the machine.
Chicago TARDIS is coming up next weekend, and I had been thinking about cosplaying a character from Torchwood. But then, Community came out with the episode Virtual Systems Analysis, where Annie plays Constable Geneva in the Dreamatorium. Since Matt cosplayed Inspector Spacetime last year, I decided to make the Constable Geneva costume.
At first, I was just going to make it really simple, and not spend much time on it. Then I remembered, I'm me. Consequently, I've been trying to find material for this costume for months, but I just could not find any fabric that would work. It looks like embroidered organza, but a thorough search of every online fabric store and a trip to Vogue Fabrics yielded no results. I finally decided to just make a gold under dress, and get some plain organza for the over dress.
And then, after a morning of running every possible search I could think of, after scrolling through hundreds of pages of Google images, I found it - the listing on eBay. The fabric was perfect. It was the perfect size, its squares were even spaced out the same as the costume fabric on Community. The only thing is that the color isn't quite right, but then again, if I could apply the same lighting and filters as they do on TV, it would probably be correct.
It was insanely expensive.
Then I realized - I'd just won $100 at the company Halloween party, and I'd been given a $50 gift card to Michael's for converting a video for a coworker. So, I decided to buy the fabric.
In the meantime, I started working on the under dress, which is gold satin. I used a pattern that was essentially a shift, and then just kept cutting it down until it was the right shape. I also shaped the top to accommodate the trim.
I also got to work on the crown. I used fun foam and plastic canvas, and painted both with a gold acrylic paint.
I also got to work on the crown. I used fun foam and plastic canvas, and painted both with a gold acrylic paint. I need to clip a few bits of canvas off of the top, but it's essentially finished.
I laid out the under dress to make the pattern for the over dress this evening, and the material isn't wide enough. Also, if you look at the picture, you can see that the squares slant inward on the sides. I couldn't figure out how they did that, but I think if I make the front panel of the dress three panels instead of one, I can cut the sides on an angle to create the slant.
I also worked on the sleeves and the trim for the sleeves, but they're not ready to go yet. I'll be working on that, as well as reshaping the dress, tomorrow. I'm hoping to have the whole costume finished by the end of the weekend.
Since I became a full-blown cosplayer, I share something in common with Joss Whedon's vampires: Halloween is my night off. The last few years, I've recycled Dragon*Con costumes. This year was going to be no different. I was leaning towards being Hermione Granger, when I got a great idea. Actually, I got the idea from a girl I work with while we worked one of the haunted attractions that our company hosts each year. We were dressed up like zombies: she was a shopping cart lady, and I was a dead body in her shopping cart. As we waited for the next group of people to come by, we started talking about Mitt Romney's "binders full of women" comment at the second debate. She said, "you should dress up as a binder full of women!"
That was a week ago. So, instead of taking the night off, I ended up making a huge costume! I put it together over only the span of three days, with the majority of the work occurring in the hours before the Halloween party we were attending. Submitted for the approval of The Midnight Society: a binder full of women.
The binder is made out of two science fair boards, the blank cardboard side facing out. I reinforced the folding sides with white electrical tape. The designs of the outside of the binder are simply retro (retro! - they're from the 90's!) Lisa Frank images that I found online. I would have preferred more unicorns and puppies, but most of the images I found were thumbnails: no good for blowing up large!
I blew up the images to just larger than the presentation boards (which were 36"x48" - I made the images 38"x50"). In Photoshop, I drew lines over the images to make 8.5"x11" rectangles, then copied and pasted each rectangle (copy the bottom layer, not the layers with the lines) into a new project. I then printed out every rectangle on a sheet of HP Brochure Paper (which is just amazing - high quality, glossy paper). I then cut them out (as they don't print truly full-sheet) with a paper cutter, matched them up, and taped the backs together.
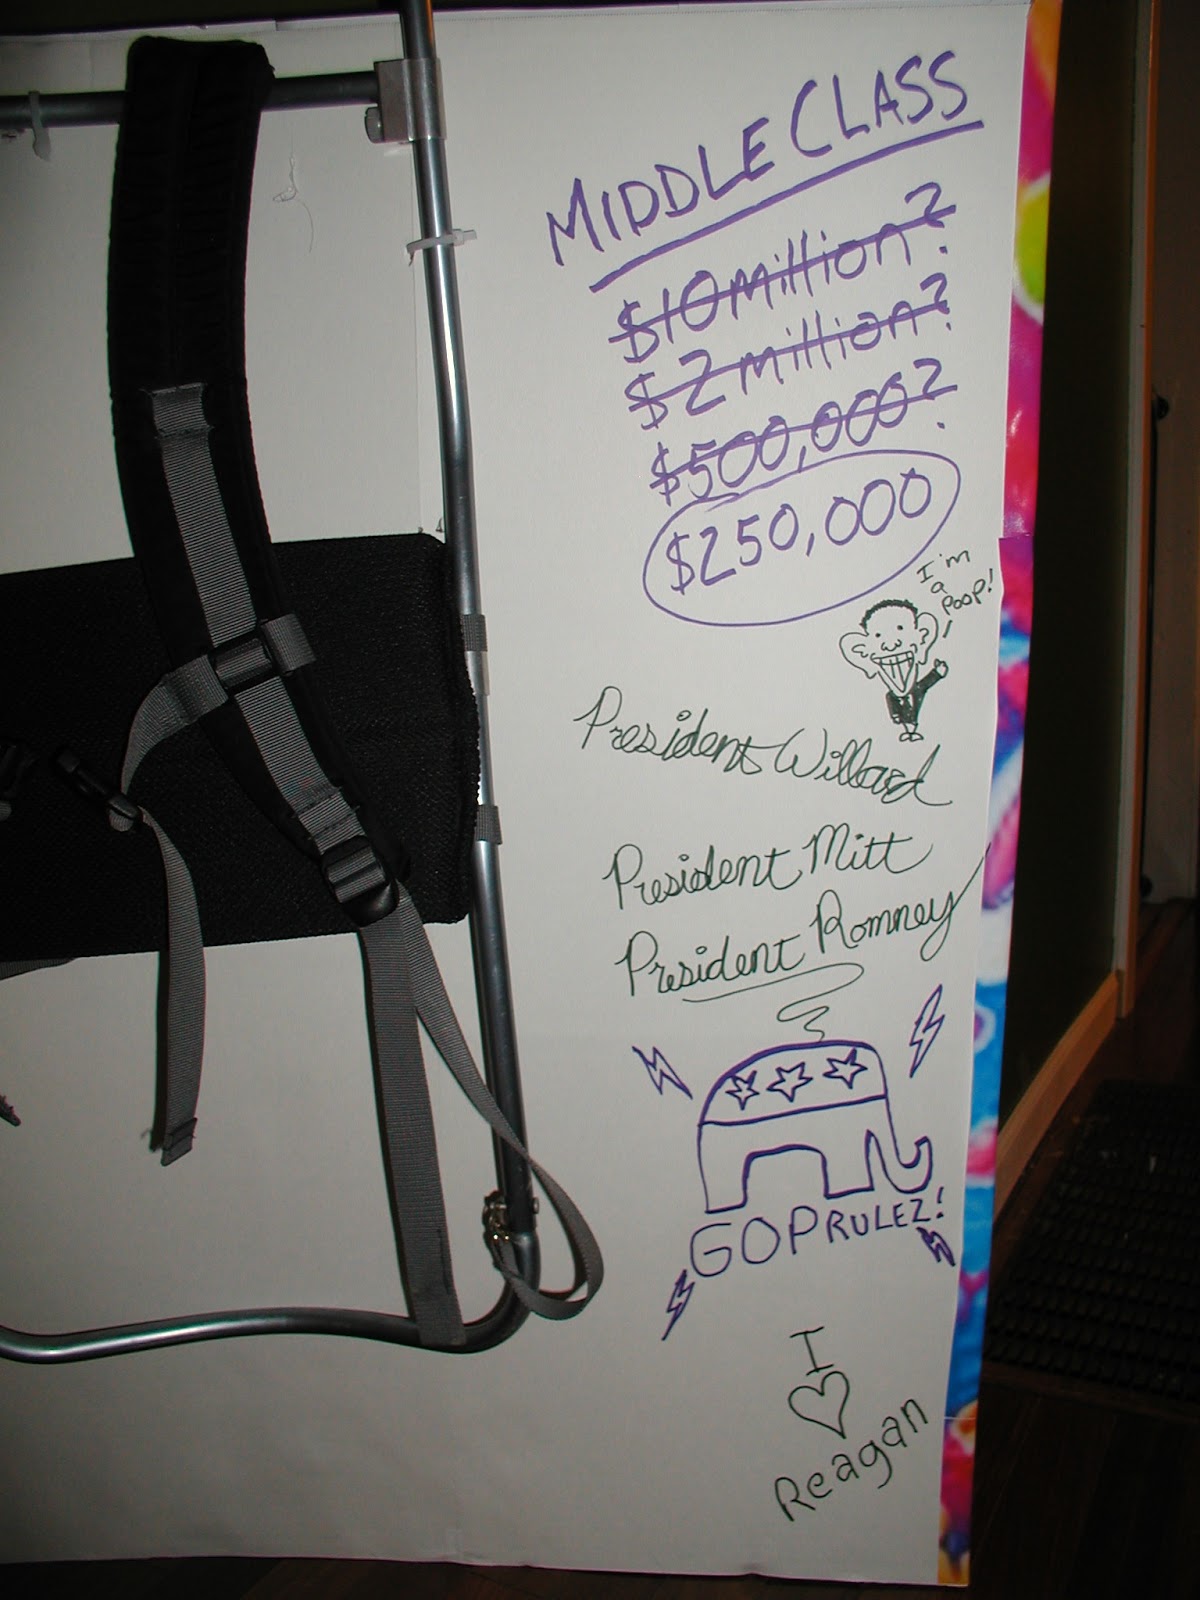
Before I attached the giant posters to the board, however, I had to cut holes for the frame. I used a hiking rack as the frame for these, and it does stick up over my head, but only because I didn't realize that the bar was adjustable until after I'd secured it. Anyway - I just shoved scissors through the board in four different areas - eight cuts total - and looped zip ties in and out, and then secured the hiking rack to the board with the zip ties. I also made two cuts on the front, attached two zip ties, and looped them through the cardboard for a kind of handle. (If you're going to do it this way, though, I recommend adding more zip ties, as one entire side broke within the first hour of wearing it.)
I then hot-glued the posters onto the cardboard with a LOT of glue (I never have luck with hot glue holding). Finally, to attach the two boards, I overlapped one of the folding sides of each presentation board and hot-glued them together.
Dolphin marriage: one boy dolphin and one girl dolphin!
For a final touch to the outside, I wrote out a "Women" label and stuck it on with double-sided tape.
Now, since I am only one woman, and the binder is full of WOMEN, I had to find some women to put in my binder. I asked several of the women I admire if they would like to be included. I grabbed some Facebook photos, printed them out on that nice brochure paper, and glued them onto poster board. I wrote out their "qualifications", and then had Mitt (my husband) make some nice, sexist notes about them.
I was going to attach my pages via rings, but it just was too complicated to figure out how to have the rings in there around me (how would they attach?) and since it was my DAY OFF, I decided I didn't care. Instead, I cut out thin strips of poster board, folded them in half, and glued them between the pages with the folded part to the back (just to help the pages open up a bit - it didn't work as well as I'd hoped). And, of course, I imagine Romney would get bored while going through his binder, so he'd graffiti it up 7th-grade-girl style. Once again, my husband stepped in and lent his artistic talent.
And here's what the inside of it ended up looking like:
See my little zip tie handle?
And, me inside the open binder:
So, voila: Mitt and his binder full of women! Go Obama!
I'm just going to take a second to be political here.
For those of you who don't know me personally, I'm a liberal. And an atheist. That being said, I don't care what your politics are or what your religion is, as long as it doesn't infringe upon basic human rights and all that jazz. Unfortunately, it seems like there's an awful lot of hypocrisy in any religion, but I'll keep my own personal feelings about that to myself. Bottom line, I might not believe, but that doesn't mean I'm trying to convert anyone to my way of thinking.
That also being said, Hobby Lobby is my favorite store. Not my favorite craft store. My favorite store. I'm there on a weekly basis. I spend thousands of dollars there every year, on costuming supplies, jewelry-making supplies, chocolate supplies, frames, cards, counted cross-stitch patterns, fake flowers, Halloween decorations, Christmas ornaments, storage boxes - you name it. The employees know me, that's how often I'm in the store.
In case you weren't aware, Hobby Lobby is a Christian company. For instance, they're closed on Sundays so that their employees can worship or spend time with their families. They sell a lot of Jesus stuff, and Testamints. The Christian aspect doesn't bother me a bit, but why should it? They don't shove their ideologies down anyone's throat, and they don't make religion a big deal (unlike the dance fabric store that has a big JESUS FORGIVES sign in their window). As a matter of fact, my husband has purchased crosses at Hobby Lobby for our vampire hunting kit, and I've used their WWJD kits to make WWWWD bracelets (What Would Wil Wheaton Do?)
Just like the majority of Hobby Lobby customers, the majority of their staff are women, so it should have occurred to me that the whole "providing birth control" thing might be an issue for them. I was outraged, but not surprised, to find out that they're filing a lawsuit over it. How dare they? Their employees are all female, shouldn't they be looking out for them? Who are they to pick and choose what their insurance covers?
Then I read that they're fine with providing birth control, but not pills that cause abortions. Wait ... what? Did I miss something, or is this some kind of crazy Duggar belief? No, I didn't miss anything; they're talking about the morning after pill as if it's RU-486. Hobby Lobby founder David Green said, "These abortion-causing drugs go against our faith." Sigh.
This is complete bollocks. The morning after pill is emergency contraception. It prevents pregnancy. As in, if you're already pregnant, it won't do anything, it won't terminate a fetus, it will just stop you from getting ... more ... pregnant? You have 120 hours to take the pill, but really, it should be taken as soon as possible. So, say a woman doesn't take the pill for some reason - maybe it messes with her hormones too much - so she and her partner use condoms, but one night, the condom breaks. The woman would use emergency contraception right away to prevent her ovaries from releasing an egg. There's no "abortion" anywhere. I'm not sure if this is part of the Duggar belief system that birth control causes miscarriages (it doesn't), or just stupidity. Do some people abuse it, and use it on a regular basis? I'm sure, but then we need to start talking about WHY it's being abused, better sex education, and why "abstinence-only" is about as logical as No Child Left Behind. And that's a whole different conversation. (Oh, and if you want to read some really jacked-up shit about why the pill causes you to abort your own babies, go here.)
The point of birth control is to stop ovulation. The rest is just kind of a bonus. The reason I was put on birth control in the first place was because I have a broken fallopian tube, and whenever I ovulated from my left ovary, it felt like a knife twisting in my side. It was VERY painful. Like, stop-you-in-your-tracks-like-you've-just-been-shot painful. The doctor said it had a kink. I would say a knot would be more accurate. Therefore, every time I ovulated from that side, I FELT IT. Since being on birth control, it's happened maybe five times. So, in fourteen years, five eggs (at least from the left side) got through. And the chances of them becoming fertilized are probably PRETTY low. So, unless you're a moron and don't know how to use your birth control, the chances that you're "killing your babies" are, in my opinion (because I didn't feel like trying to find statistics), exceptionally low.
Therefore, as of today, I'm boycotting Hobby Lobby, not because I don't support their right to their beliefs, not because I'm some kind of Christian-hating atheist, but because I don't support their willful ignorance. They're fighting against something that's not even true, and in the process, they're spreading myths and lies, and starting a tempest in a teapot. Hiding your political agenda behind your "beliefs" is dirty and low, and does a disservice to religion in general. I feel that Hobby Lobby should be above that, and it disappoints me. I'll be sending a letter to David Green, and if you feel the same way I do, then please consider doing the same.
Hobby Lobby Stores, Inc.
7707 S.W. 44th Street
Oklahoma City, OK 73179
My latest costume was a group costume - the Fruity Oaty Bar Girls from the movie Serenity. My friends Samm, Sera and I put the costumes together over a course of three months.
For the body, we used a blue full-body spandex suit and cut off the head. For shoes, Samm dyed white Keds and put in blue ribbon laces.
I couldn't find knitted fabric in the correct colors for the outfits,
and the knitted fabric seemed to work best against the spandex. I found
the dark green, dark purple, and red at JoAnn fabrics. For patterns, I
altered Simplicity 3833 because it had the proper cut for the
shoulders. For the red outfit, I simply made it one piece and longer.
For the purple outfit, I made a crop top and skirt and put elastic in
the band. For the green outfit, I extended the bodice and attached it
to the pants from Simplicity 2401. As I had put the zippers on the
sides, I also dropped the crotch of the pants to make it easier to get
into the green outfit. I really should have used a different pattern,
one without a seam in the front and back so that I could have made the
front and back one piece like the others.
The hardest part was trying to figure out how to make the head. Samm and I originally tried paper mache, but that didn't work. We then turned to 1" foam. It took one yard of foam per head. Samm shaped the heads by cutting apart a beach ball, then using each piece as a pattern for the foam. She cut a hole on each side (where the ears would be) for ventilation. She and Sera drew on a face, then cut out the mouth. Samm and Sera covered the heads with batting (to make the seams smoother) and used a piece of foam for the noses. Samm also cut a hole into a rectangular piece of foam, then glued them into the heads as a halo that rests on our heads. Therefore, we're supporting the weight of the head with our head, not our shoulders.
We used blue fleece from Hobby Lobby for the faces, gluing them on with spray glue. It was very difficult to get them to be smooth, and we didn't want seams right on the front of the face. We made two cuts on the neck, and I stitched them up. However, I didn't like how it looked, so I ended up pulling off each face and reapplying the blue fleece. This time, I pulled the fleece as tight as possible and pinned it in place. I managed to work the fleece so that there were no seams on the face.
After gluing down the faces, I set about working on the hair. It was a pain in the neck! I tried using the same technique as the face, but because there was more hair, it didn't work that way. I tried making several pattern pieces, but they never quite worked. See, it turned out later that when the faces were drawn on, they weren't symmetrical, so I had to make the hair for each head separately. I ended up finding a basic pattern - one piece for the top of the hair, two similar pieces for the sides, a rectangular piece for the back of the head, and a trapezoid for the bottom of the hair.
After cutting out all the pieces, I pinned them on. However, in order to keep the seams from puckering, I had to pull the pieces really tight and cut off the excess. To stitch the seams, I used this tutorial. It took me about 5 hours per head, but it worked really well, and I didn't even have to "pick" the fibers out of the stitches (doing so actually made it look scuffed up). I then turned the fleece under around the edges and stitched it with very small stitches. We finished it by tacking it down on the edges with hot glue.
For the buns, we used styrofoam balls, two for the green Fruity Oaty girl and a larger one for the purple Fruity Oaty girl. To finish, we screwed a 4" screw through the head and into the styrofoam balls. I stitched the fabric down onto the other hair.
For the bands, I bought fun foam in the correct colors and cut them with a paper cutter to the proper width. However, it didn't quite match the fabric I'd chosen for the outfits, so I painted them with matching acrylic paint. I then simply wrapped them around the hair and hot-glued the ends together. For the chopsticks in the purple hair, I painted two wooden knitting needles that were cut in half. I then cut small holes in the hair with an Exacto knife and pushed the knitting needles into the styrofoam.
For the ponytail on the red Fruity Oaty girl, I measured the width of the head as well as the height and width of the ponytail on the cartoon, then measured the head we'd made. I used math (GASP!) to make a pattern with the same proportions, cut out two pieces (front and back) and stitched it together with a whip stitch. I then turned it inside out and stuffed it with pieces of leftover batting. I stitched it onto the head. However, it flops more than I'd like, but that's only because the foam of the head can't support the weight. I'm thinking of building a frame for the top of the head and then running something up into the ponytail to hold it up.
I painted the inside of the mouths with black acrylic paint, then hot-glued two pieces of black chiffon over the opening. Two layers are VERY important. When someone takes a photo with a flash, eyes will be visible behind only one layer. Two layers are harder to see through (they make everything blurry and can cause dizziness), but they are enough to keep your eyes from showing through. Sera cut out the eyes, mouth, freckles, and eyebrows from felt, and we glued those on as well.
For the final touch, I constructed an octopus out of foam core and fun foam. I printed out a shot of the octopus and free-handed the bits that weren't visible in the shot. I then cut out the pattern and traced around it on the back of the foam core. For the details, I traced the tentacles, drew in an outline, and then cut that out of white fun foam that I painted to be the right color. I also cut out circles in several sizes. After cutting everything out, I painted all the sides to match. The eyes were white circles cut out of the same (unpainted) foam. I cut the pupils out of black fun foam that had a sticky back. For the detail around the eyes, I simply painted them with the pink paint. (I had tried cutting it out of fun foam and then setting the eyes into it, but it didn't work.) I cut everything out with an Exacto knife, then trimmed off anything extra with scissors. Finally, I sanded down a piece of spare wood, painted it black, and glued it to the back of the octopus.
If I were to redo it, I would use fun foam for the eyes, mouth, and
other facial details, and heat it to shape it. Foam is really easy to
use for multiple things including armor. There are multiple tutorials like this
all over. I would also put in a fan in each head. I didn't think it
was hot at ALL (it was MUCH cooler than my Clockwork costume, in which I
drip sweat just standing around doing nothing), but Samm and Sera had a
really hard time with them. Also, the mouths aren't the right shape,
so I'd want to remake them (but that would mean remaking the heads
entirely).
I'm a cosplayer who recreates costumes from Doctor Who, Star Wars, Lord of the Rings, and pretty much anything that catches my eye. I try to provide as much information as possible so that you can adapt the techniques and resources that I use in your own costuming.


